 Patience Hurlburt-Lawton
YouTube ads are an insanely effective way to get in front of audiences who are already engaged.
As one of the most popular websites on the planet, YouTube has a massive volume of users.
And unlike dated television ads, users are typically on devices that allow them to click on an advertiser’s call to action (or open a new search to learn more about the brand) as soon as they see an ad.
And let’s be honest:
Videos are the easiest way to absorb information (like remembering a new or familiar brand)—and make it stick.
So, whether you want to reach more prospective customers or reconnect with past visitors to your site, YouTube ads offer a direct line of contact.
YouTube ads: What you’ll get from this ultimate guide
We’re going to cover virtually everything in this guide.
Starting with the basics (how does YouTube even work??) ending with tutorials to build your own YouTube ad campaigns.
You can start from the very beginning or skip ahead to the tutorials.
Wherever you’re starting from today, we’ll meet you there.
By the end of this guide, you’ll walk away with your own:
- Google Ads Account
- YouTube channel for your business
- Video script and templates
- Video ads (or an understanding of how to create them later)
- YouTube ad campaign, set up and ready to go!
Table of Contents
Part One
All About YouTube
What Is YouTube? (So Much More Than Cat Videos)
What Are YouTube Ads?
How Does YouTube Work?
How YouTube Advertising Works
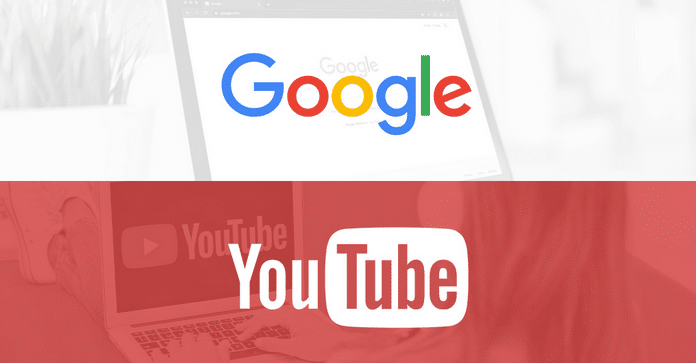
The Google-YouTube Connection
Part Two
Google Ads for YouTube
YouTube Ad Types
How YouTube Ads Appear: The Google Ads Auction
YouTube Ads: Ad Rank
What Are You Bidding On, Anyway?
How Much Does It Cost to Run YouTube Ads?
Part Three
YouTube Ads: Core Concepts
Targeting and Audience
Messaging and Offers
Optimization (The Flywheel)
Part Four
Prerequisites
Are YouTube Ads Right for Your Business?
Business Requirements
How to Define Your Customer Avatar
Customer Value Journey (CVJ)
Part Five
Creating Your Video Ads
Get Your Audience Hooked and Engaged
Video Ad Sequences
Video Script Guide
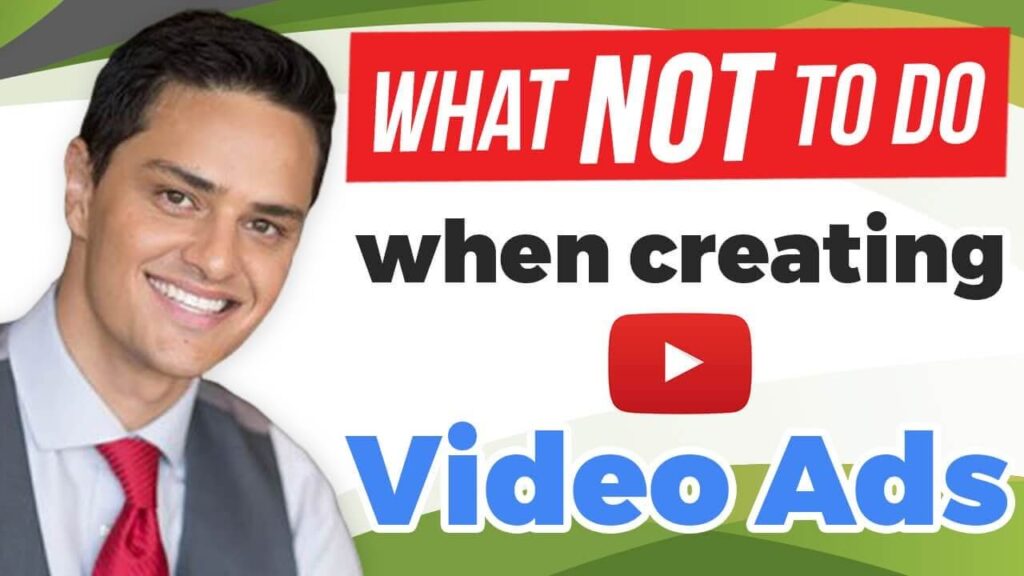
What NOT To Do When Creating Video for YouTube Ads
Part Six
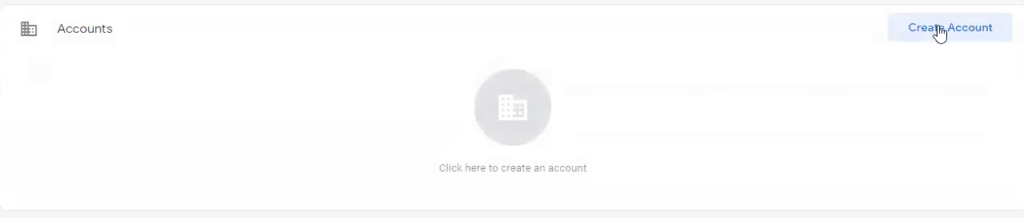
Setting Up Your Accounts
Creating Your Google Ads Account
Conversion Tracking Setup
Tracking Website Conversions with Tag Manager
Creating Your YouTube Account
Create Your YouTube Channel
Connect Your Google Ads and YouTube Account
Part Seven
General Campaign Setup
How to Create a Lead Generation Campaign
Creating Your Video Ad
Skippable In-stream VS Non-skippable In-stream: Our Recommendation
Creating Custom Audiences
How to Add Audiences at an Ad Group-Level
Negative Keywords
Part One
All About YouTube
What Is YouTube? (So Much More Than Cat Videos)
YouTube is a video sharing site created in 2005 by three former PayPal employees.
Think of it as a video library where audiences go to learn how to change their oil—or watch the latest Hollywood movie trailer.
Dominated by user-created videos (i.e. average people with iPhones, not production companies), YouTube is considered both a social media platform and a search engine.

In fact, YouTube is widely considered the second most popular search engine behind Google itself, who purchased the platform in 2006.
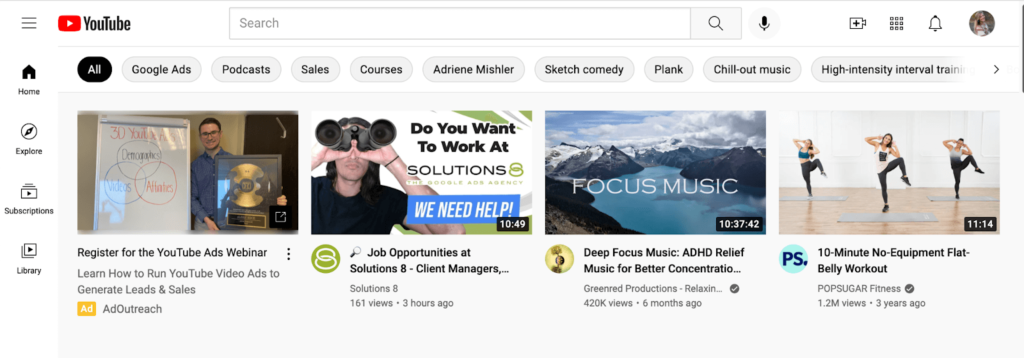
What Are YouTube Ads?
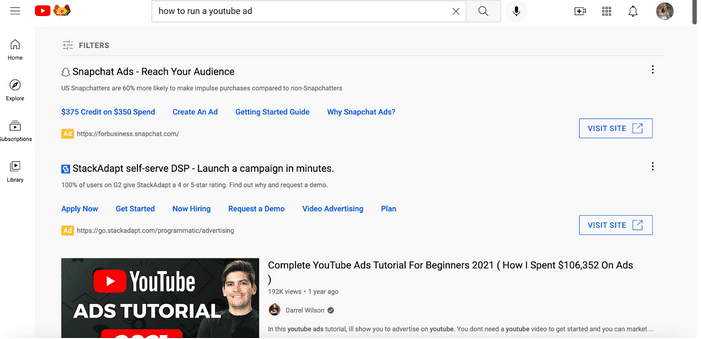
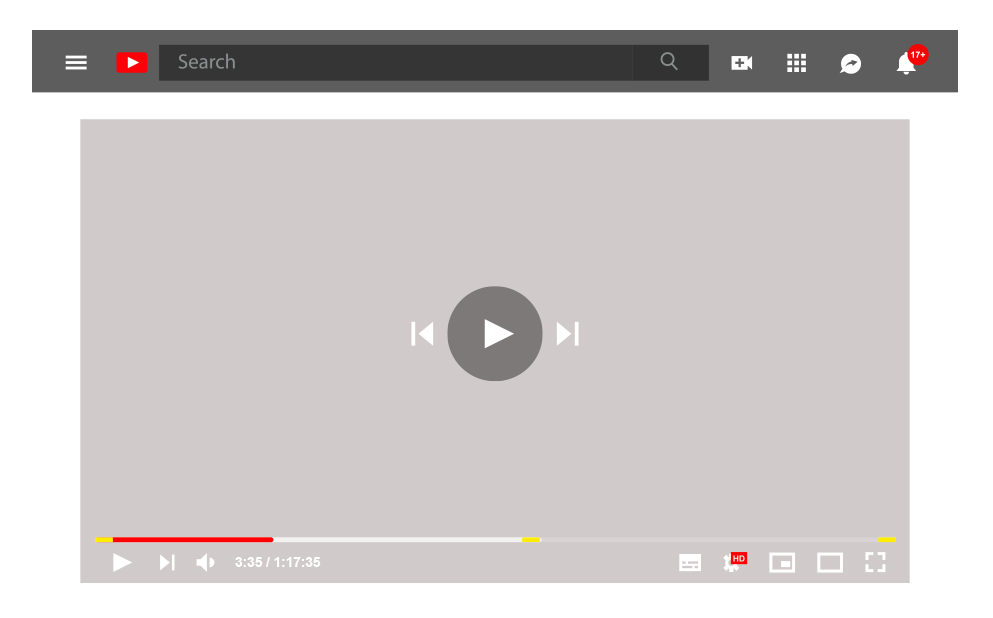
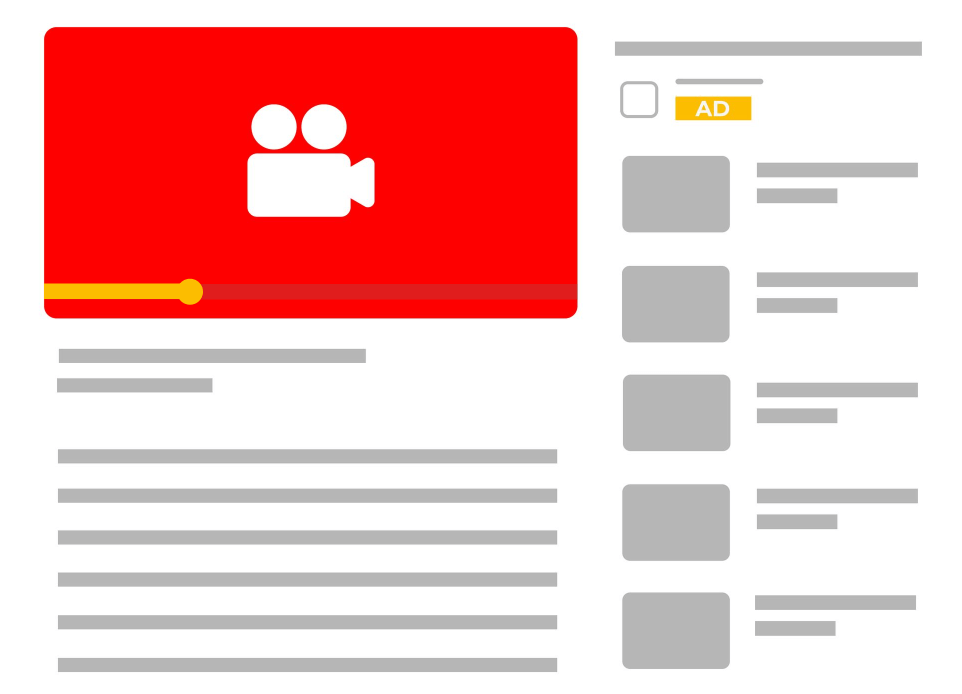
YouTube ads pop up across the YouTube platform: on the homepage, search results page, but most noticeably on the watch page before, during, or after a selected video plays.
These ads look like:
- Video ads
- Banners
- An [Ad] box
Video ads are what we’ll focus on in this guide:
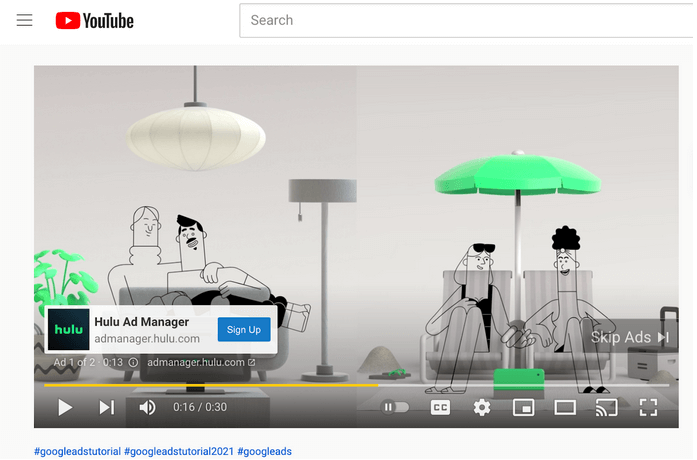
Skippable video ad
Some of these video ads can be skipped (skippable ads), some can’t (non-skippable).
Some are super short, some can be longer.
But we’ll elaborate on the types of YouTube ads (and how to make them) later.
But before we do:
How Does YouTube Work?

Let’s breeze through the basic functionality of YouTube before we build our ads.
YouTube (the Platform)
YouTube’s platform is open for all internet users (like Google search), meaning anyone with access to the internet can hop onto YouTube.com and watch videos.
⬇️
Account
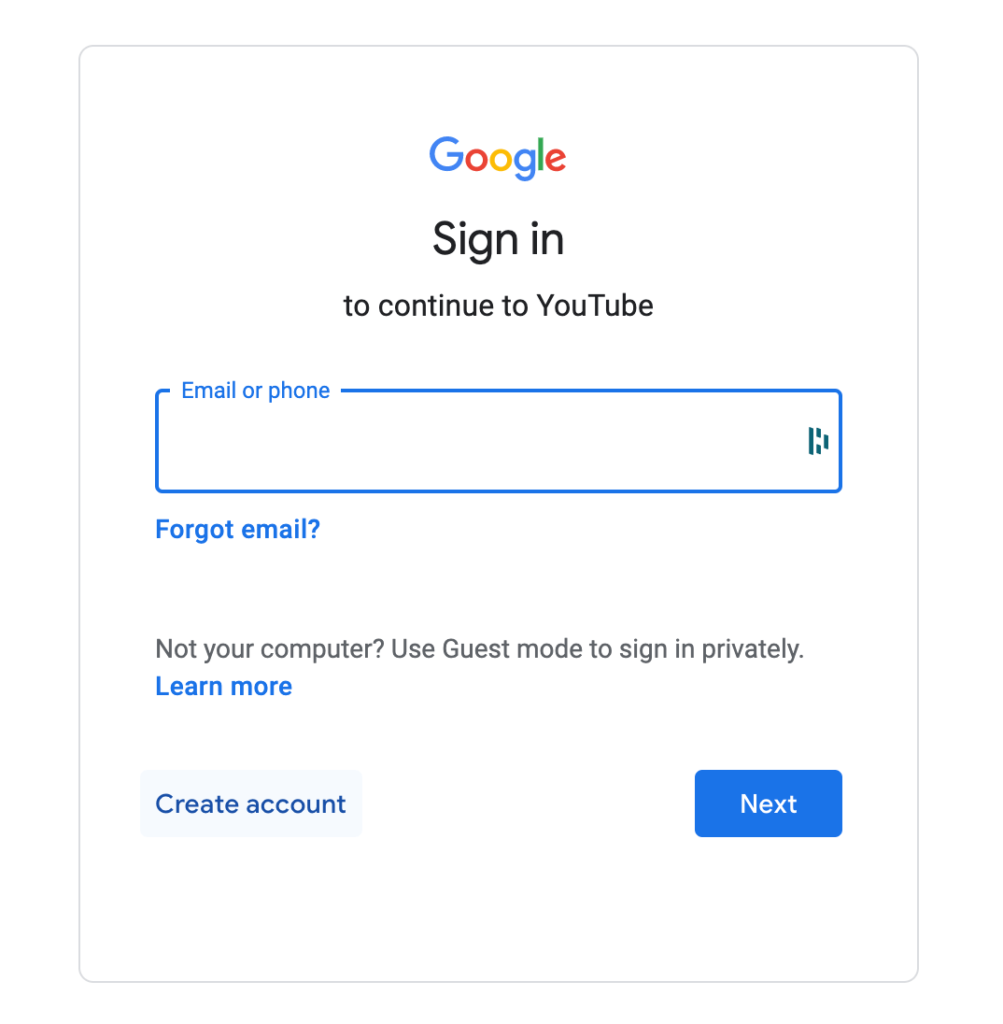
Now, if you want to actively participate in YouTube, you have to create a free account first.
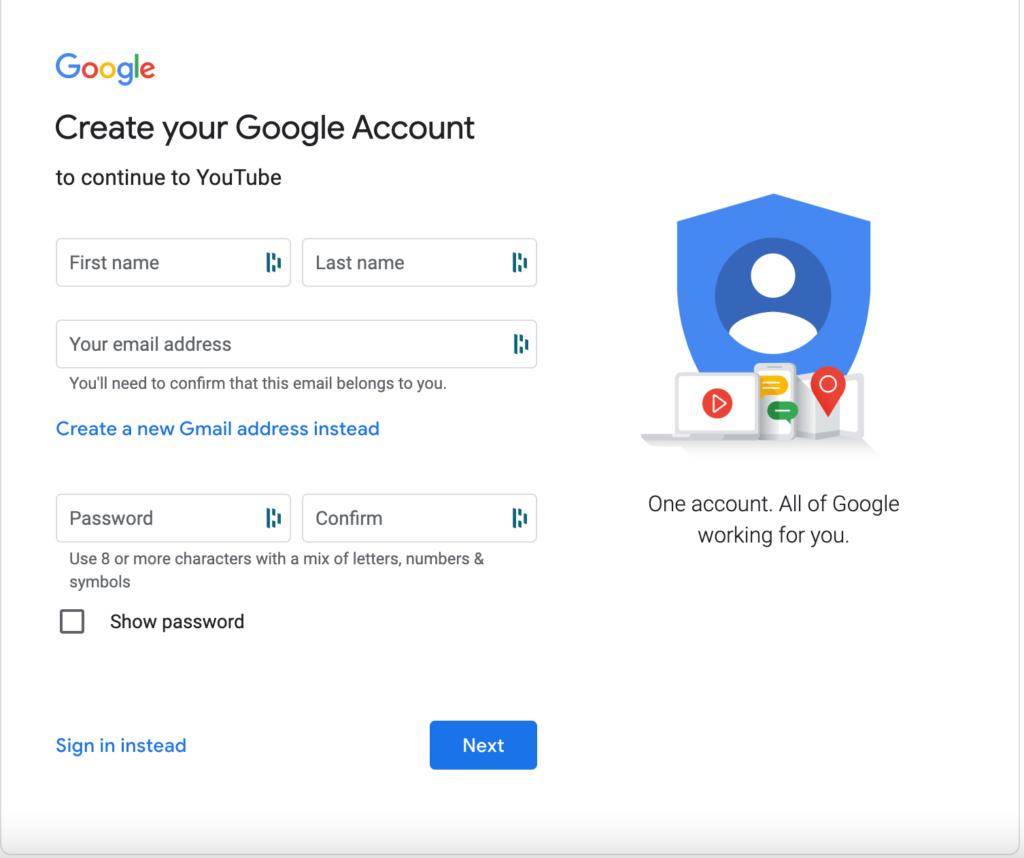
If you already have a Google Account, great news! You can simply log in using your current Gmail information:

Once signed into an account, you can:
- Explore
- Subscribe to channels
- Look through your library of recently viewed videos
- Save videos to watch later
- Create or save playlists
- Review videos you “liked”
⬇️
YouTube Channels
When you create a YouTube account, your channel is your homebase for:
- Videos you create
- A history of videos you “like” and watched
- Playlists you create
- Information about your brand
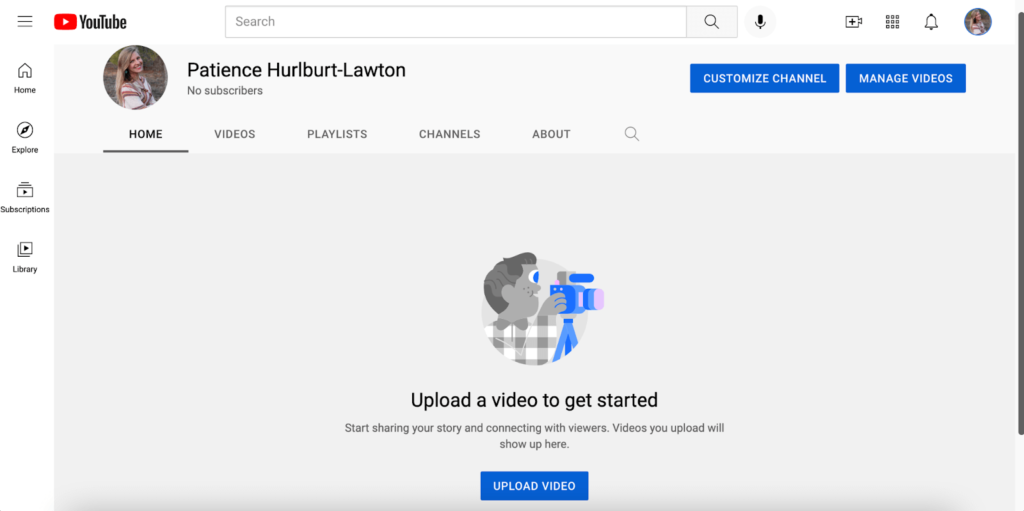
Other account-holders can subscribe to your channel, which notifies them when you upload a new video.
Speaking of uploading videos…
YouTube Video Formats
One of the things that makes YouTube such a successful video platform is its ability to upload a wide range of file formats.
Meaning, a low-quality phone video and Hollywood-level production can both be easily uploaded to a channel.
YouTube Video Metadata
Metadata is a way to describe your video to YouTube so it can properly categorize its massive library of videos.
These descriptors include:
- Tags
- Titles
- Thumbnails
These little details accompany your video to help YouTube determine which videos should appear as a search result.
…or an ad.
When we upload blogs to websites, we always include metadata (URL, title, ALT text, description)—and YouTube videos (including video ads) are no different.
From Creation to Metadata to Search Result
So, that metadata comes into play when a user enters a search query in YouTube:
YouTube is a lot like Google search here.
Once a search is entered, YouTube uses an algorithm to decide which videos display in the search results—and which ads show up at the top of the page (we’ll talk more about this in a moment):
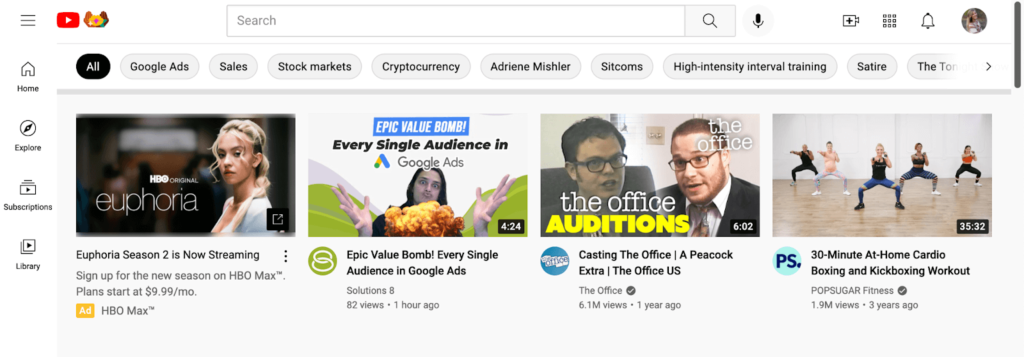
As a user, you can search for specific videos using the search bar—but YouTube’s homepage will also offer a selection of videos (also including ads) relevant to your past searches or what’s trending:
You can watch, like, share, save, and subscribe to channels with a Google Account.
How YouTube Advertising Works
YouTube ads are run through the Google Ads platform—but the videos used for these ads are uploaded and hosted on the brand’s YouTube channel.
So, to become an advertiser on YouTube, brands go through the same initial process to create a channel and upload videos.
At the same time, the advertiser also has to create a Google Ads account (or login to an existing account) and link it with YouTube. This allows Google Ads to access the videos the advertiser wants to serve viewers.
Once those ads are created and running, advertisers only pay when the user either:
- Watches 30 seconds of a video ad
- Watches the entirety of the video ad (if it’s under 30 seconds)
- Clicks on the ad
The set up and ongoing management is all done through a Google Ads account.
The Google-YouTube Connection
Google owns YouTube. So, YouTube Ads = Google Ads.
Here’s Why That’s a Big Deal
Google’s network is massive, including:
- Google Search
- YouTube
- Gmail
- Apps (think Google Calendar)
- Google Maps
- Android
- The Google Display Network
- Google Analytics
We turn to Google (the search engine) with every question we have.
And as a result, your Google search history is one of the most intimate insights into who you are. This gives Google a chance to know you on a deeper level than you might even know yourself.
…and YouTube, as an entity of Google, has access to all that information.
In fact, not long ago Google began allowing advertisers to target viewers based on Google search history, as well as watch history that YouTube was already targeting.
Part Two
Google Ads for YouTube
YouTube Ad Types
How YouTube Ads Appear: The Google Ads Auction
YouTube Ads: Ad Rank
What Are You Bidding On, Anyway?
How Much Does It Cost to Run YouTube Ads?
Google Ads is Google’s advertising platform—and the platform where YouTube Ads are built, managed, and optimized.
You might think of Google Ads as those results at the top of a Google search results page, branded with a small [AD] box:
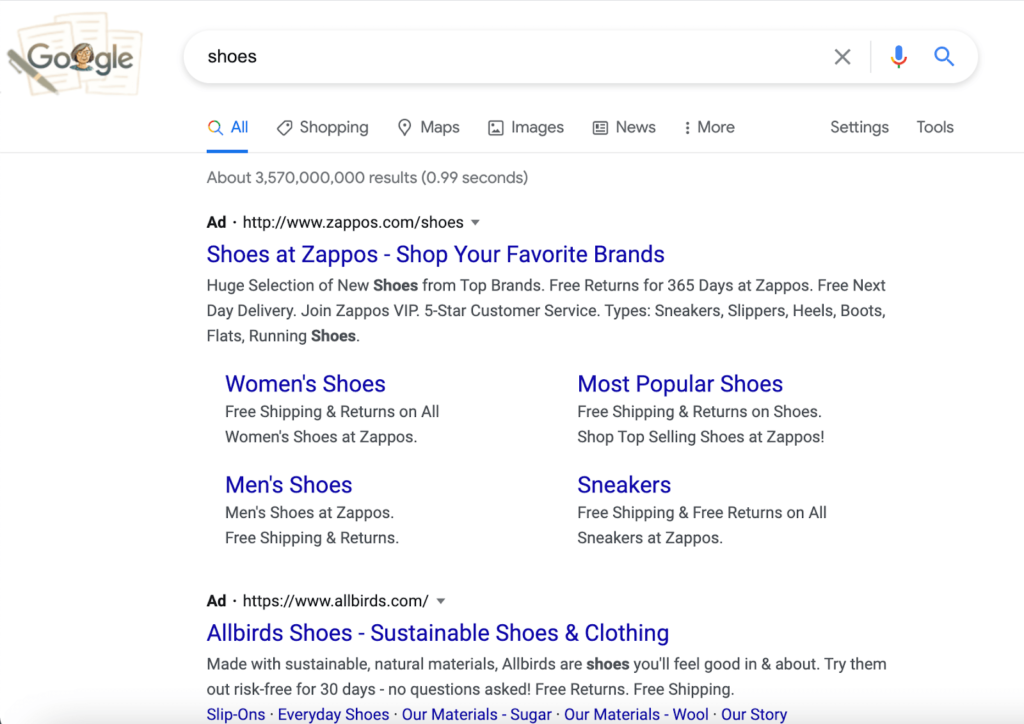
But that is actually only one form of Google Ads (specifically Google Search Ads).
See, for every piece of “real estate” owned by Google (email, search engines, YouTube, apps) there is a way to advertise:
- Google Search Campaigns
- Google Shopping Campaigns
- Google Display Campaigns
- App Campaigns
- Google Smart Campaigns
- Google Discovery Campaigns
- Video Campaigns (YouTube Ads!)
Ah, and this is what we’re here for.
YouTube Ad Types
We touched on this earlier, but you’ve probably noticed different types of ads while watching videos on YouTube.
To be specific, there are five different types of YouTube ads:
- Skippable in-stream ads
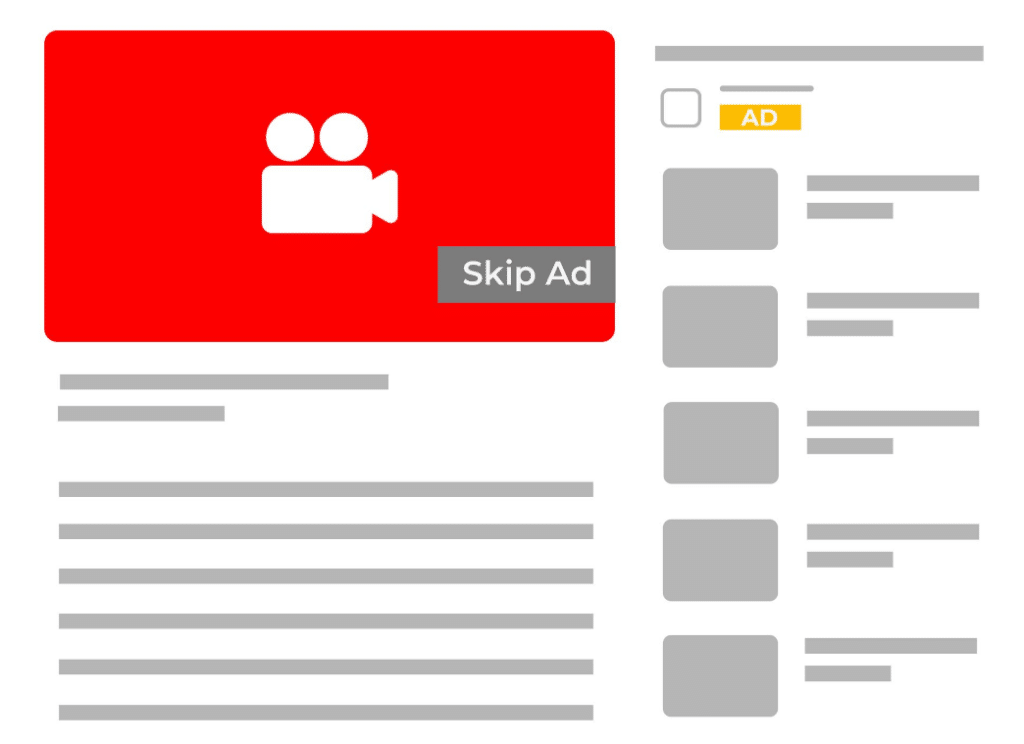
Skippable in-stream ads are:
- Displayed before a video plays, in the middle, or after
- Full-screen video ads
- Can be skipped by the user after five seconds
- At least five seconds long
- However, these ads should ideally be at least twelve seconds long in total and under three minutes
- Accompanied by a banner ad at the top of the screen, which remains even if the user chooses to skip the ad
Advertisers are only charged if the viewer watches 30 seconds of the entire ad (if it is under 30 seconds), or if they click on the ad.
- Non-skippable in-stream ads
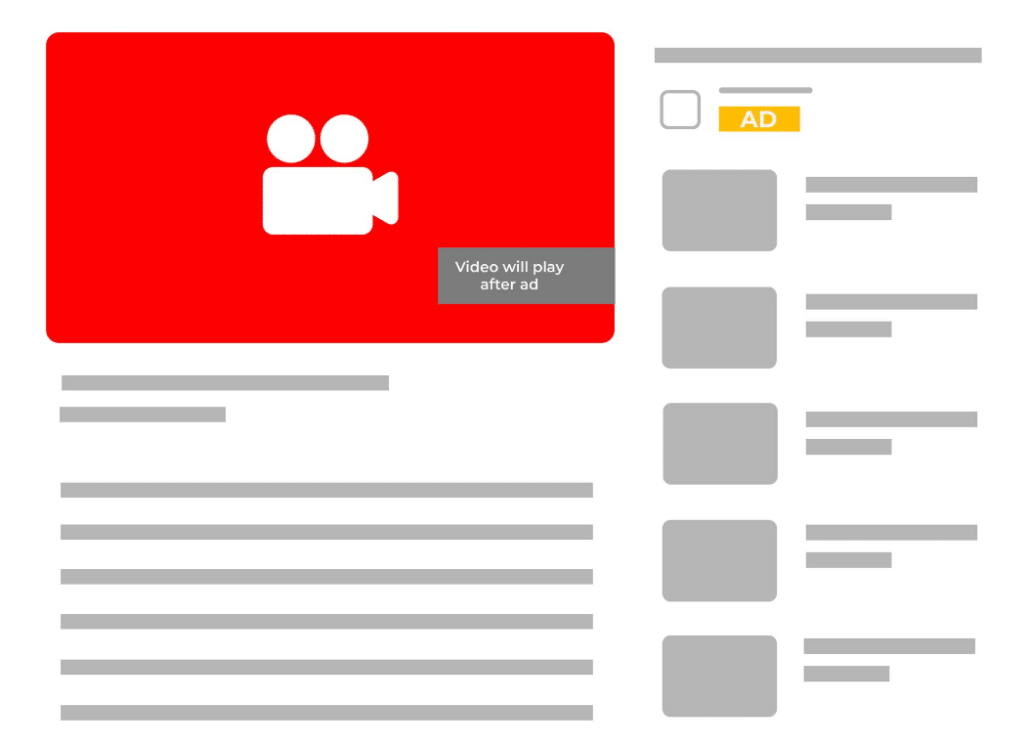
- Full-screen video ads
- Cannot be skipped by the viewer
- Can play before, during, or after the selected video
- Long non-skippable ads can be up to 30 seconds long
Advertisers pay by impression (per 1,000 impressions) i.e. every time their ad appears.
- Bumper ads
- Full-screen video ads
- Short (up to 6-seconds)
- Cannot be skipped by the user
- Play before a video can be viewed
Bumper ads, as a form of non-skippable ads, also charge advertisers by impression.
- Video discovery ads
(Formerly known as in-display ads)
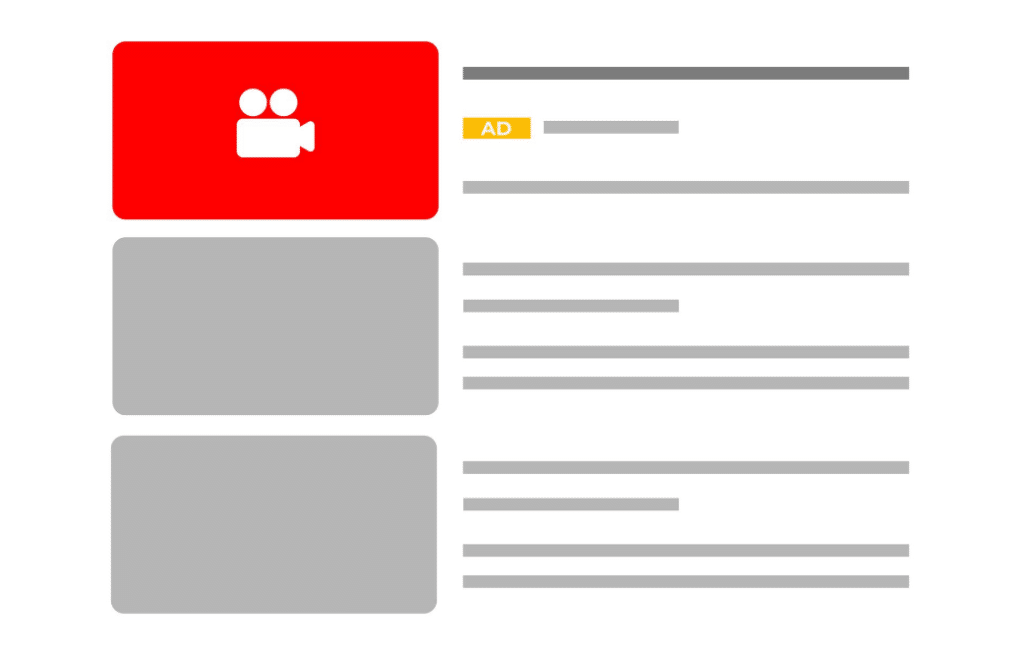
- Appears in search results (like Google search), in the suggested videos section of a video watch page, or the homepage
- Labeled with an [Ad] box, but otherwise blends in with other search results:
Include a thumbnail image and three lines of text
- Further, when a user clicks on the ad, it takes them to the video watch page—just like an organic result
Advertisers pay only when a user clicks on this ad.
- Non-video ads

Overlay ads are banner ads that:
- Pop up in the middle of a video
- Appear on the lower 20% portion of a video
- Can be closed anytime by clicking an “X” in the top right corner any time
- Users who click on the banner are directed to the advertiser’s chosen landing page
Advertisers only pay when a user clicks the ad.
Quick Side Note:
There is one other type of ad you’ll see inside of YouTube called display ads. These ads appear on the YouTube homepage and the watch next feed, featuring an image, text to the right of the image, and a button that takes the user to a separate landing page.

However, display ads are not YouTube ads.
Rather, they run through Google Ads display campaigns and charge the advertiser whenever the ad is clicked.
How YouTube Ads Appear: The Google Ads Auction
Now, YouTube ads undergo the same auctioning process as other Google Ads.
So, an advertiser creates their video ads or overlay ads and makes a bid on where they would like those ads to be seen—and how much they are willing to pay for it.
Then, YouTube rakes through all the other prospective ads vying for the same ad space and determines which ad “wins.”
YouTube determines the winner by ad rank.
YouTube Ads: Ad Rank
Ad rank is Google’s way of assigning value to your ad to determine when and where it is displayed. The highest ranking ad wins the auction.
In other words, how much you bid on your ad is only one of several factors Google takes into account when determining ad rank (who earns the advertising spot).
The relevance of your ad is another key factor.
Bid = The maximum amount of money you’re willing to pay
Relevance = The usefulness of your ad and the site it links to, according to the user.
More specifically, Google Ads explains that ad rank is calculated using:
- Your bid amount
- Auction-time ad quality (this includes expected clickthrough rate, ad relevance, and landing page experience)
- Ad rank thresholds
- Competitiveness of an auction
- Context of the user’s search (this includes location, device, time of search, nature of the search terms)
- The expected impact of extensions and other ad formats
Additionally, YouTube calculates other factors such as the competitiveness of the auction, the ad rank thresholds (your ability to compete in an ad auction), and who the user is (based on things like geographic location, device, and past searches).
Is the ad rank calculation for, say, Google search ads different from YouTube ads?
Maybe, considering YouTube likely takes things like view time into consideration.
That said, Google doesn’t come right out to tell us this.
But our experience shows the same paradigm across platforms and ad types:
The more likely Google thinks a particular user will engage with your ad (relevance), the higher your ad rank will be.
But, again, there is no way to know your ad rank because this measurement is recalculated every time your ad competes in an auction.
Just Because You’re Willing to Pay More, Doesn’t Mean You Will
This is where things get even more interesting with the Google Ads auction:
The highest bidder may win the bid, but only pays the second highest bidder’s price.
This is brilliant because it means advertisers are bidding for the value of the click, instead of bidding against each other.
What Are You Bidding On, Anyway?
Bids are advertiser’s way of telling Google what kind of person they want to see their ad—and how much they are willing to pay to make that happen.
So, advertisers can specify their ideal audience by bidding on:
- Keywords
- Topics
- In-market audiences
- Affinity audiences
- Lookalike audiences of your visitor or conversion data
- Customer lists
Generally speaking, the more specific you are with Demographic Targeting, the higher the bid needs to be to win the auction; however, Google Ads for Youtube allows advertisers to bid low for very narrow demographics. So, we recommend starting with a wide net and narrowing in on your targeting (and, thus, bidding) over time.
Or, you can even leave the targeting off and let Google find the users for you. This means Google will use AI to identify the target and expand on their own based on if its getting conversions or not.
How Much Does It Cost to Run YouTube Ads?

Like most “how much does it cost” questions, the answer depends.
YouTube ad costs are based on views.
Typically, one view costs less than $0.50, but this of course depends on the competitiveness of your industry and keywords.
By setting a daily budget, Google will put a limit on your maximum spend per day.
That said, for successful YouTube ads, a daily budget should be your current cost per acquisition multiplied by sixteen.
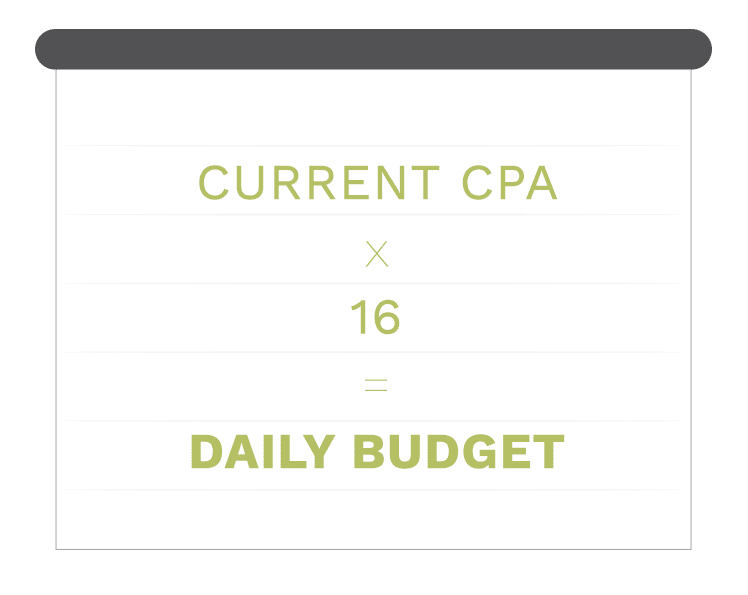
Not sure what your cost per acquisition is?
Cost per Acquisition is the total cost of a prospect taking an action that led to a conversion (keep in mind: a conversion might be a sale, but it can also be defined as “opting in” to an offer like a click or download).
So, to determine your CPA, calculate:
Total cost of a campaign / Number of conversions
Now, going back to the daily budget formula, multiply that number by sixteen.
Further, at Solutions 8, we recommend spending $5000/month for effective campaigns.
If you’re thinking this sounds more pricey than other Google Ads—you’re right.
And here’s why:
An Extra Step Means Extra Cost
With YouTube, advertisers pay for views, but optimize based on conversions.

This means there is an extra step involved for YouTube Ads:

That one extra barrier in YouTube ads increases the length of the cycle.
That’s why we recommend a larger budget with YouTube—because you need to gather much more data before you can start to see results.
Part Three
YouTube Ads: Core Concepts
Targeting and Audience
Messaging and Offers
Optimization (The Flywheel)
1. Targeting and Audience
Targeting on Google is generally very intent-based.
Targeting on YouTube is avatar-based.
Let’s break that down a bit:
Google search (intent-based) = The user has a problem or interest and is actively looking for a solution or answer now.
YouTube (avatar-based) = The user has an established problem or an interest but they aren’t necessarily ready for the solutions or answer now. They need a little more time to learn.
So, when targeting based on avatar, that means you’re targeting based on interests—even if those interests exist outside of your product or service.
Here’s an example:
Let’s say you’re a recruiter. Specifically, you help software companies recruit talent.
When advertising on YouTube, you might target users who are watching videos on how to increase efficiency or market a software company.
See, even though you’re not an efficiency manager or a marketer, the avatar is still dead on (software business owners)—even if the specific video topic isn’t your particular service.
After targeting your avatar based on interests, it’s a matter of driving them further down the funnel (educating them).
Unlike Google search ads (intent-based), users aren’t going to click your ad and buy right out of the gate.
Instead, YouTube is the long-form sales letter: position yourself in front of your target audience and slowly “drip” content on them over time, all while learning what your customers’ purchase path is.
This is honestly, pretty tedious. But with the right audience (and advertiser) can be extremely effective.
2. Message and Offers
With YouTube Ads especially, everything you present to your visitor should be an offer.
Your offer is the thing you’re giving your prospective customer.
Above all else, we want to focus on giving value.
Too often, we see advertisers essentially introduce themselves, rather than inform the user what they will do for them. And with YouTube ads particularly, you don’t have much time to catch your audience’s interest. Take those precious seconds to hook ‘em with an offer!
Credentials mean nothing without a clear understanding of how it will directly change the customer’s life.
The Magic Formula for Crafting Your Offer
Specificity
+
Continuity
=
Success
3. Optimization (The Flywheel)
The Flywheel
Finally, we like to take a minute to lay out what we call the Google Ads Flywheel.
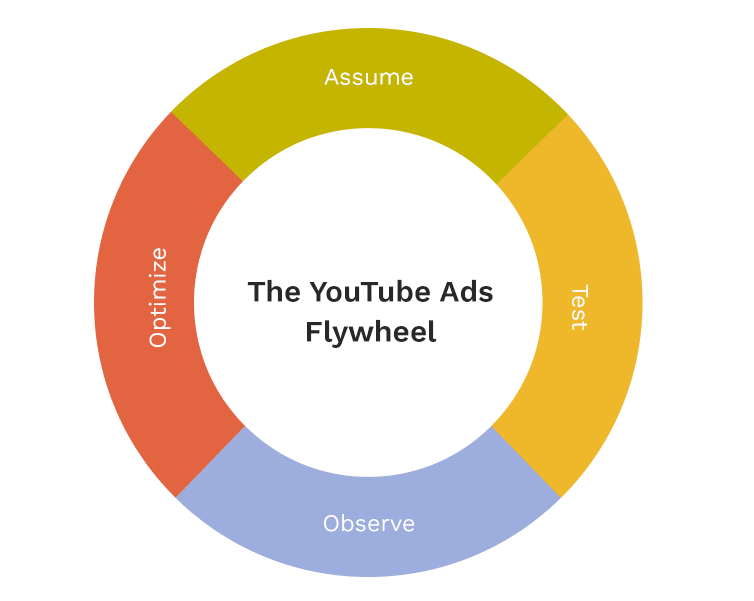
Before we dig into building our YouTube Ads campaigns, it’s important to understand the cycle to success (and it probably isn’t what you expect):
1. Assume
Yep. While “assuming” typically has a negative connotation, it’s the very first step toward successful campaigns. In the beginning, you are going to guess: what your message should be, your hook, your script, your audience. And you’re probably going to guess wrong as often or more often than you guess right—and that is okay. Because next:
2. Test
This is the scary part. Once you’ve made assumptions (about search terms, topics, target audience, offers, ad copy, your landing page), you have to put them to the test.
It’s scary because there’s a chance your assumptions might be dead-wrong and you’ll fail. But if you don’t go for it, you’ll never find out what works. And remember, finding out what doesn’t work is also valuable.
3. Observe
Google tests all video ads in an ad group against each other to find the winner.
Once it finds a select few videos it sees good results from, it pushes about 80% of the ad spend to those videos in order to optimize the ad group quickly.
Google needs quantity more than quality when it comes to YouTube ads; so the more videos you give the ad group, the better the results are going to be as it will find more videos it “prefers.”
4. Optimize
The KPIs to monitor if Google “likes” a video are CTRs over 0.50% and a watch rate over 22%.
Once Google achieves this, those are the videos that will get the majority of the spend and conversions.
One way to leverage this is to continually upload additional videos to the ad group to see if google “likes” any new videos as it tests them.
…And then? We look to expand and scale with new ads, starting with step one again.
This flywheel never ends.
Part Four
Prerequisites

Before we get into the how-to of building your YouTube ads campaign, let’s make sure your brand is right and ready for YouTube advertising.
Are YouTube Ads Right for Your Business?
Here are a few business requirements:
- Reasonable monthly spend
- 90(ish) days to prove concept
- Unique selling proposition
- A long sales cycle
- Confidence with media creation
- Ability to handle an influx of traffic
- Completed Customer Avatars
Let’s explain:
1. Reasonable monthly spend
(And enough margins to support a traffic campaign)
As mentioned earlier: we recommend spending $5000/month.
Yeah, it’s not cheap.
Here’s why:
With any form of Google Ads, your monthly budget early on is an investment.
You are buying data you need to understand what works in your campaign, what doesn’t, and where to make changes—in a reasonable amount of time.
With that investment, Google will start to build an audience specifically for you that you will capitalize on later.
And it will be worth it! You *must* have enough monthly ad spend to accumulate enough accurate data for testing and optimizing down the road.
$5000 per month too steep? Maybe you want to hold off until it’s more feasible.
Google is a learning algorithm. The first three months are going to be the most “painful” part of your campaigns. Which brings us to our next requirement:
2. 90(ish) days to prove concept
It bears repeating that Google is a learning machine. And learning takes time.
In fact, we’re asking Google to do some pretty spectacular behavioral analysis.
After you set up your YouTube campaign, Google learns:
- When customers interact with your ads
- How many times users click on your ads
- What channel those ads are clicked
- How long it takes for the prospect to come back
- What channels they come back to
- Which other products they view
Once Google has all that data, it determines how many other customers follow through the same pattern or similar cycle.
So, for a 15-day sales cycle (meaning it took 15 days from when a customer first clicked your ad to when they made a purchase), you might have to wait a full month for sales to start coming in. Meaning it will take a full month for Google to begin to gather data for testing and optimizing.
Again, those early days are tough. But by day 90, you should have enough data to tell whether or not the campaign will work long term.
3. A unique selling proposition
(…which your audience needs to be educated about)
The more heavily saturated your market, the harder it’s going to be to turn a profit from Google Ads for YouTube.
That said, if there is a reason to go with you as opposed to your competitors, YouTube is a great option.
So, what makes you different?
The more unique selling propositions, the better.
Once you have a list, create a video for each individual selling proposition (don’t put all your “whys” into one video!), then create a sequence (drip).
YouTube takes time, and it gives you the opportunity to engage with people over time with ad sequences (showing a series of ads to your audience).
Your unique selling proposition is key for the success of these campaigns—specifically longevity and return traffic.
After all, it’s six times less expensive to sell to an existing customer than a new one.
4. Long sales cycle
Businesses with a long sales cycle generally do better with YouTube ads because it allows you to stay in front of your audience.
YouTube ads are great for remarketing, so long as the advertiser is providing value—not just generalized remarketing.
5. Confidence with media creation
YouTube likes to split test five videos at a time to choose one “winner.” That means you’ll need to create five videos, only for 80% of them to go out the window—then do it all again the next time you have a message or want to optimize your campaign.
And here’s the kicker:
Your business needs to be comfortable with creating these video ads yourself. This means without hiring someone to over-produce videos for you.
More successful ads come from DIY content straight from the brand.
6. Ability to handle an influx of traffic
Are you going to answer your phone when customers call?
Are you fully stocked and ready to ship?
Can you accurately forecast how much product you need?
Will people call you directly, or will you have a sales team that’s trained and ready to take calls?
While YouTube ads might send leads and customers your way, you need to be sure you have the ability to scale first.
7. Completed Customer Avatars
Not only do you need to know who your target audience is, they also have to be:
- On YouTube
- Easily identifiable
- Educated about your product or service (i.e. anything B2B)
Now, a lot of business owners think in terms of demographics—not avatars.
Here’s the difference:
A demographic is a generalized description of your population of customers (physicians, for example).
An avatar is the sub-type of customer that comes from your larger demographic.
So, using our physician example, this demographic could easily be split into two very different avatars:
Dr. Mike: An older physician in his late fifties to sixties, looking at retirement, with a successful practice and anti-technology.
Dr. Sally: A young physician fresh out of medical school, in debt but looking to get started with her own practice and a solid understanding of technology.
Here, we can see how vastly different these two avatars are within the same demographic.
All this is to say, get specific with your customer profiles.
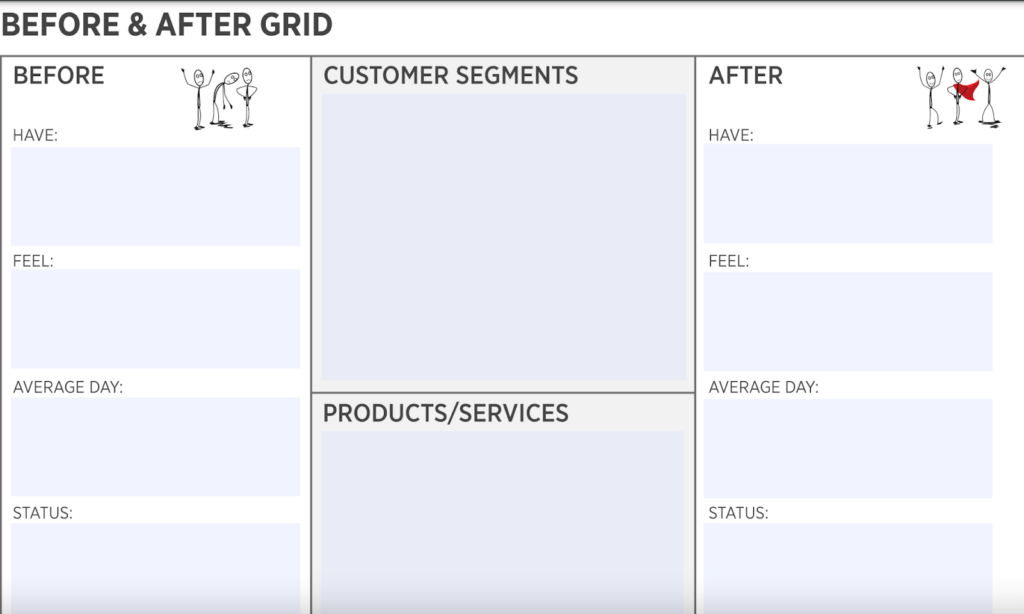
How to Define Your Customer Avatar
Define Your Customer Avatar
Use this worksheet to identify your customer avatar (and who is NOT your customer avatar). The questions in the worksheet help you get in the mind of the customer.
Try DigitalMarketer’s “Before and After Grid”
Once you’ve defined your customer avatar(s), it’s time to consider the transformation they make when purchasing your product. After all, customers don’t buy products—they buy feelings, results, and solutions.
DigitalMarketer has a phenomenal “before and after” worksheet that you can download here.
Make a copy and fill it out with your customers in mind, including:
- What your customer has (or doesn’t have) before buying your product—and what they gain once they do.
- How they feel before your product—and how they feel after
- What an average day looks like before your product—and an average day after
Next, consider your Customer Value Journey.
Customer Value Journey (CVJ)
The “customer value journey” construct was developed by DigitalMarketer.
Essentially, we need to know the customer’s story and journey to finding you. What steps does your customer take to buy your product or service—from start to finish?
And FYI, the “start” pretty much never begins with you.
We’re talking way back when the idea of your product or service first flickered in their mind.
What process did people walk through to find you? It’s not the process where you began, it’s where they first became aware of the need for your product or service.
Part Five
Creating Your Video Ads
Now that you know exactly who your audience is and what your unique selling propositions are, it’s time to create your video ads.
Get Your Audience Hooked and Engaged
Video Ad Sequences
Video Script Guide
What NOT To Do When Creating Video for YouTube Ads
First things first:
If you want to build effective video ads, you need to grab your audience’s attention with a great hook. While brainstorming, here are some tips to get your audience hooked and engaged:
- Start from the climax. Drop your viewers in the middle of the action––the most exciting or interesting scene in the plot. When you start at the peak of the climax, you successfully catch their attention.
- Make sure the story is relevant to your audience–and specifically made for your avatar. Address your viewers’ wants and needs and make them feel like the story is about them.
- Use imagery and language (e.g. script) that your viewers aren’t expecting. This helps in disrupting behavioral patterns, beliefs, and any preconceived notions about your story or offer.
- Keep your viewers guessing. Add some element of surprise to keep the anticipation going. Only reveal enough information that will make your audience curious to find out more.
With those tips in mind, let’s get started on our video ads!
Video Script Guide

Most people don’t have a lot of patience when it comes to watching ads, even if they only last for a minute (or less!).
By the end of this section, you should be able to write and structure your own video scripts without a sweat.
Connect With Their Identity
By this point, you will have done your research and created your customer avatar. Using that information, you need to address your viewers so they know you’re talking about them.
Here are two of the most common ways to do that:
1. Address your specific audience by mentioning demographics––age, gender, job, location, marital status, etc.
Do they speak a certain way that only people of the same demographic group can relate to?
Here’s an example from Chatbooks’ ad:
“I have three kids and I work from home so people call and ask me how I stay organized…”
2. Address your specific audience by mentioning psychographics. Maybe your prospects have certain beliefs, values, and behaviors that separate them from others.
Here’s the continuation of the Chatbooks’ ad script:
“I’m kidding. Do you think I have time for a bath?”
Any mother who has kids can easily relate to the previous example. But “no time for a bath” is a different story that targets a more specific audience.
It’s a story that only those people who have experienced it know. It speaks directly to mothers who don’t have time to do things they want.
Even though mentioning the demographics of your prospect is effective, it doesn’t go as deep and powerful as their psychographics.
That’s because demographics points to groups of people who share similar statistical data.
Psychographics point to individuals’ experience. And one of those is their “problem.”

Source: Chatbooks’ YouTube video
Describe Their Problem
“Most people are wired to be more motivated to move away from pain than they are towards pleasure.”
If your prospects aren’t aware of their problem, it’s going to be impossible to make them buy––because your offer won’t matter.
That’s why it’s important to describe your prospect’s problem in a way that they perceive it.
One of the most common mistakes that people make is talking about a problem that isn’t tangible and visible. Here’s an example of a vague problem description:
Do you feel stressed and overwhelmed?
Leading your video this way only guarantees more confusion. Aside from that, it only talks about their feelings––not the actions that caused them to feel a certain way.
Don’t keep them guessing. You want to instantly capture their attention by talking about their problem the way they describe them. What do they see/hear/do when they’re having this problem?
It’s hard to manage my workload. My team keeps missing deadlines.
When you describe the problem this way, you automatically build rapport, connection, and show that you understand exactly what they’re going through. Then, lead them towards the intangible stuff––what they feel.
Struggling to meet deadlines? Feeling stressed and overwhelmed by a mountain of work?
Another thing you might want to do is point out the consequences of not solving the problem. What happens if they keep missing deadlines?
Constantly missing deadlines can lead to losing projects––or worse, getting fired.
Agitating the problem by showing what the possible consequences will get them to do one thing: Find a solution.
Offer Solutions
Pointing out the solution is more important than mainly stating the problem.
Unfortunately, a lot of people focus too much on selling their product instead of selling the solution. They talk about what the product is (features) but not what the product does (benefits.)
But here’s the thing:
People buy the transformation, not the product.
They want to know how your product can help them gain something they don’t currently have.
They want the results.
How will your product transform people’s lives? That’s what you need to communicate. Do that by talking about the benefits of your product.
Want to showcase the features of your products? No problem! Just make sure they’re tied to the benefits of the product.
For example:
Our software has a project dashboard [feature] that helps you easily view, access, and monitor all projects, making task management more convenient and efficient [benefit].
Eliminate Objections
It’s not uncommon for people to have certain objections about your product. If they didn’t have any, they’re either not interested or they’ve already bought your or your competitor’s product.
Having objections is not a bad thing. In fact, anyone who has an objection about your product is probably a hot lead! You just need to know how to flip it.
Objections usually fall into two categories––general and offer-specific.
1. General objections are those that involve time, money, and beliefs (e.g., “I don’t have time to do this,” “I don’t have the funds right now,” “I don’t think this will work.”)
The way to handle these objections is by understanding the meta frame––what they’re really saying.
“I don’t have time to go to the gym.” What they’re really saying is going to the gym is not important enough to make a priority.
“I don’t have money.” What they’re really saying is they don’t see the value of the product relative to its cost.
“I don’t think this will work.” What they’re really saying is they don’t trust the product/service because they haven’t seen it work yet.
2. Offer-specific objections are those that revolve around your product and the way it’s offered.
For example, the company Stairslide sells a product that turns your stairs into a slide. In their ad, one of the questions the mother asked is “but is it safe?”
And her son addressed it by saying:
“I’m no lawyer. So, legally I can’t say it’s ‘more safe’ than any other way to slide down stairs. But it’s definitely safer than other ways I’ve ‘slided’ down stairs.”
So, list down the possible objections your prospects might have about your product. Then, find out how you can dismantle those objections. You can also use these language patterns to shift your prospects’ perceptions and beliefs.
That said, if you really want to turn a skeptical audience into hot leads, then look no further because I’m about to tell you the most effective way to address objections.
And that is to show proof!
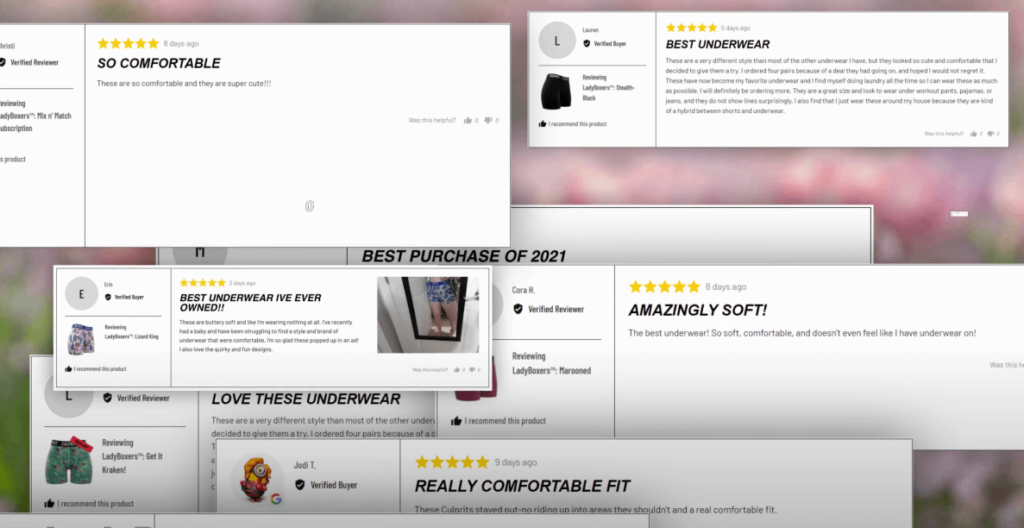
Source: Culprit Underwear’s YouTube video
Show Proof
Anyone can make bold claims about their products––and most business owners do. However, making big promises, more often than not, tends to backfire.
Instead of attracting customers, it repels them.
Why? Because they’ve “heard it all before.”
I wish it were that easy to convince people. But with all the ads people are exposed to every day, the market is becoming more and more sophisticated.
That’s why it’s important to show proof.
Weight loss industries leverage proof in their ads. It’s almost impossible to see a weight loss or fitness product that doesn’t somehow show photos of their customers’ “before and after” journey. It’s a marketing technique that never fails.
If showing proof worked for them, it’ll work for you, too.
Here are a few ways to show proof in your video:
- Read testimonials and reviews from your past customers. Here’s what Culprit Underwear did in their ad.
- Talk about your best case study.
- Highlight any social proof you have. Have you worked with a famous person or company? Do you have a significant amount of followers or subscribers? Have you received any note-worthy awards? Mention them.
The point is, including proofs in your video can make your promises legit and get you more sales.
Now that you know what it takes to create a great YouTube video script, it’s time to create a structure. And it all boils down to these three things:
- What do you have?
- What can it do for me?
- How can I get it?
In other words, you need to create the hook, the content, and the call-to-action (CTA).
The Hook
The hook is probably the most important among all three. You can remove the CTA or the content, and still get people to watch. But removing the hook will have a big negative impact on your views. And here’s why.
It determines whether or not your viewers will watch your video. See, nobody likes being interrupted with video ads. People usually go on YouTube for two reasons: To learn or to be entertained.
Showing an ad while they’re watching is a form of interruption. Which means the ad better be darn good or else they’ll skip it.
Now, of course every click (and skip) matters. And you want to pay for clicks from interested people only. Which brings me to another advantage of using a hook…
It can act as a qualifier. This is especially true for skippable in-stream ads. By using a hook, you’ll effectively attract your target audience and repel those who aren’t interested.
Mention their identity together with their problem. For example, “If you’re a small business owner [identity] struggling to grow your Shopify store [problem], I can help.”
I know. It’s not the best hook in the world but it does what it needs to do.
The Content
Since you already captured your viewers’ interest, you need to make sure they really grasp the advantage of your offer.
It’s hard to convince someone to buy if they barely know your product and what it can do for them.
That’s why you want to use the things we talked about earlier––the problem, solution, objection, and proof––in your message.
Now, depending on how long your video is, you may not need to include everything. And that’s okay. But at the very least, you must provide the outcome/benefit of your product and show proof it works.
The CTA
Speaking of “taking action,” don’t forget to add a call-to-action (CTA) at the end of your videos.
Convince your viewers that now is the best time to take action. Make that thing easy to do.
If you want them to check out your website, mention the web address and add a link.
If it’s possible, give clear and detailed instructions. Tell them what’s going to happen next.
For example, instead of just saying “Download my ebook now!” say something like:
“Click the link below to download your ebook. Enter your email address, hit submit, then you’ll get the ebook delivered straight to your inbox in just a few minutes.”
And lastly, add a reason why they must act now. There’s no better way to motivate someone to do something than to tell them what’s in it for them.
For example, instead of saying “Shop now!” say something like:
“Shop now to get your 20% off.”
Adding an advantage to your CTA increases the desire to take action.
Don’t know what CTA to use? We got you covered. Here’s a list of the most commonly used CTAs:
- You / Your (non-CTA)
- Free (non-CTA)
- Now
- Get
- Online
- Apply
- Save
- Best
- Act
- Compare
- Discover / Learn
- Download
- Call / Contact
- View / See
- Watch / Read
- Try
- Visit
- Sign-up
- Submit
- Check
- Look
- Join
- Purchase / Buy
- Save
- Request
- Register
- Order
- Pay
- Shop

The Only Things You Need to Create Your Video
We’ve shared some ads in the previous videos and you’re probably wondering “These ads look expensive to make! How much does it cost to create a video for my YouTube ads?”
The good news is you don’t have to spend thousands of dollars for a project like this. And we’d rather you use that money for your ad spend.
You don’t need expensive gears, backgrounds, and you don’t even need to travel. You can shoot the video at home if you like!
If you’re on a budget, here are a few things that you just need to get started:
- Any decent camera that can take videos. This can be your phone, laptop, or DSLR. Just make sure that the videos you produce are of good quality. There’s nothing worse than a video that’s blurred or pixelated. This ad by Elizabeth Hartke is a great example of an ad that was taken with a phone.
- A teleprompter. If you’re anything like me, you probably don’t like memorizing. Well, a teleprompter is exactly what you need. It displays your text in front of you, making it easy to read your script. Here’s a video on how to use teleprompters.
If you’re using a phone, the most affordable teleprompter app I’ve used before is called Selvie App. If you’re reading it on your computer screen, try White Hat Crew’s free online teleprompter.
- A video-editing software. First off, you can definitely use a video that’s not edited. One example is Tai Lopez’s very controversial ad. However, there are cases where you might want to cut or trim parts of your video. That’s where video-editing software helps.
There’s a lot of good video editing software out there. If you’re on a budget, YouCut is a popular choice for PC and android users while iMovie is good enough for Mac and iPhone users.
Bottomline
Investing in YouTube ads is one of the most effective ways to drive traffic and sales. After all, there’s a reason why it’s the world’s second-largest search engine.
The success of your ad depends on how well-targeted your audience is, and of course, how great your messaging is.
That’s why we created this post––to help you craft the right message in your scripts. Don’t forget to download these FREE YouTube Video Scripts so you don’t have to create everything from scratch!
Fill up the Form Below to Download our Helpful One-Minute Script Template
Video Ads Sequencing
When creating your video ads, it’s important to keep sequencing in mind.
A video ad sequence is made up of a series of video ads that you’d like to show to a person. Each sequence campaign is made up of a series of ‘steps.’ Within each step of a sequence is an ad group and a video ad.
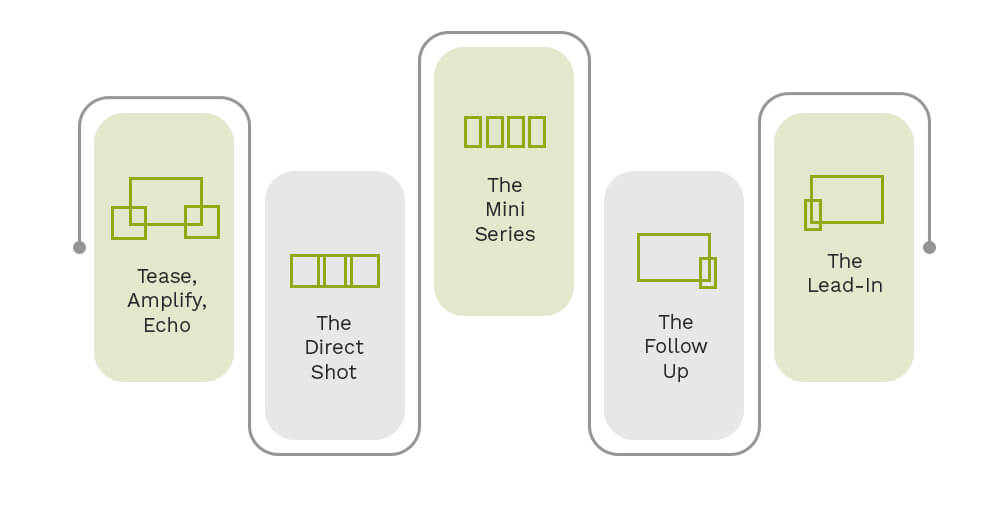
We consolidated our five favorite video sequences below:
Tease, Amplify, Echo (Three Videos). This sequence is composed of three videos:
Start with a six-second video to tease the audience.
Then, amplify your message with a longer video that explains your offer.
After that, end with a six-second ad to reinforce your message and nudge viewers to take action.
The Direct Shot (Three or More Six-Second Videos). This type of sequence uses the same video format but from different angles to avoid repetition and viewer fatigue.
We recommend you limit your videos to six seconds and make sure you break down products or services into clear value propositions.
The Mini Series. These are like the direct shot, but with longer form videos.
What makes the mini series so effective is you can sequence the video ads based on how users engage with your content. If someone viewed your video, you can serve more ads they might be interested in. If someone skipped your video, you can show a more straightforward video with a CTA.
With the mini series, you can break videos into different parts of the story––the conflict, the climax, and the resolution.
The Follow-Up (Two Videos). In this video ad sequence, you start with a long form video that explains your brand and your offer. Then, follow up with a shorter video to keep the message alive and drive your viewers to your CTA.
The Lead-In (Two Videos). This video sequence involves two videos. First, a six-second video that introduces the narrative and teases the story.
Next, a longer video that presents your product’s features, benefits, and USP. Don’t forget to end with a strong CTA.
Additional Tips:
- Since videos are often skippable, it’s critical that you mention your brand or company name and your offer within the first six seconds.
- For a bigger impact (but not mandatory) show your company logo within those first six seconds, and place it anywhere except the bottom right.
- Start with a question or shocking statement in the first ten seconds.
- Tell the viewer “what’s in it for them” (make them the hero of the story).
- Video length and aspect ratio aren’t important.
- Don’t mention time-specific details. Keep the content evergreen, because Google has to re-optimize every time the video is replaced.
- Make a handful of videos and let Google rotate between them to find the winner. Don’t limit yourself to one video.
- Google will create sequences from your videos automatically (i.e. it will show video A to a user and then video B to the same user if it finds that to be the order that gets the highest engagement)
Once your videos are complete, it’s time to upload them to your YouTube channel!
Bonus Protip:
When uploading your ads, set them as “unlisted.” Google recommends that you split test five videos or more, so you’re going to have a handful of video ads that all say (pretty much) the same thing with different hooks, value propositions, or calls to action. If all these videos are visible to the public, it’ll make your channel look super messy!
Check Out This Video for What NOT To Do When Creating Video for YouTube Ads
Overwhelmed? Here’s the easiest way to get started:
- Go to Videohive.net and search for “Explainer” to find explainer video templates.
- Find the one you like and write the script.
- Then send the script to someone who makes videos on Fiverr.
- Then find someone else on Fiverr to do the voiceover.
Once your videos are created, we can set up our accounts (if you haven’t already) and build your campaigns.
Part Six
Setting Up Your Accounts
If you haven’t created your Google Ads account or YouTube account, we’ll walk through this with you.
If you already created these accounts, we still recommend skimming through this section to make sure your conversion tracking is set up accurately!
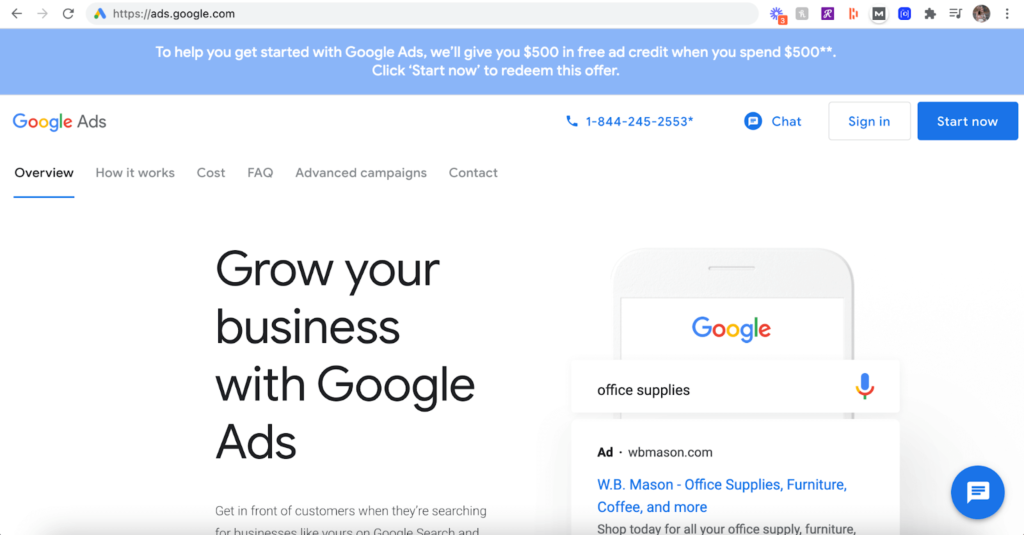
If you haven’t created a Google Ads account, you’ll need to set one up before running YouTube ads; so, let’s run through it together real quick:
☐ First step: Head to Ads.Google.Com
☐ Click the bold, blue CTA that says “Start now”
If you already have some sort of Google account (Gmail, for example), Google will automatically connect that existing account to your new Google Ads account.
In this next step of setup, Google will try to get you to build a campaign right away.
We don’t want to do this just yet.
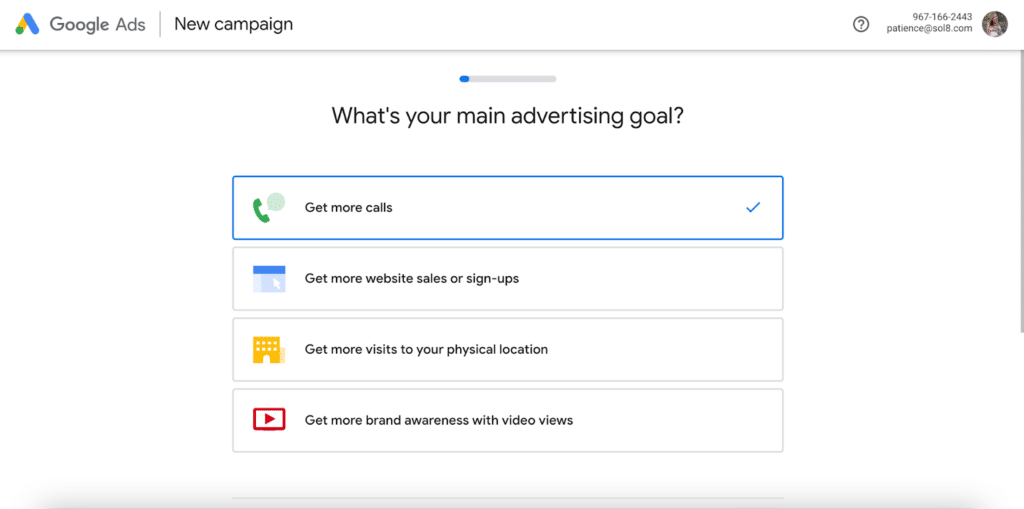
See, during your account setup, Google asks what your main advertising goals are so you can build your campaign around that goal.
Makes sense, right?
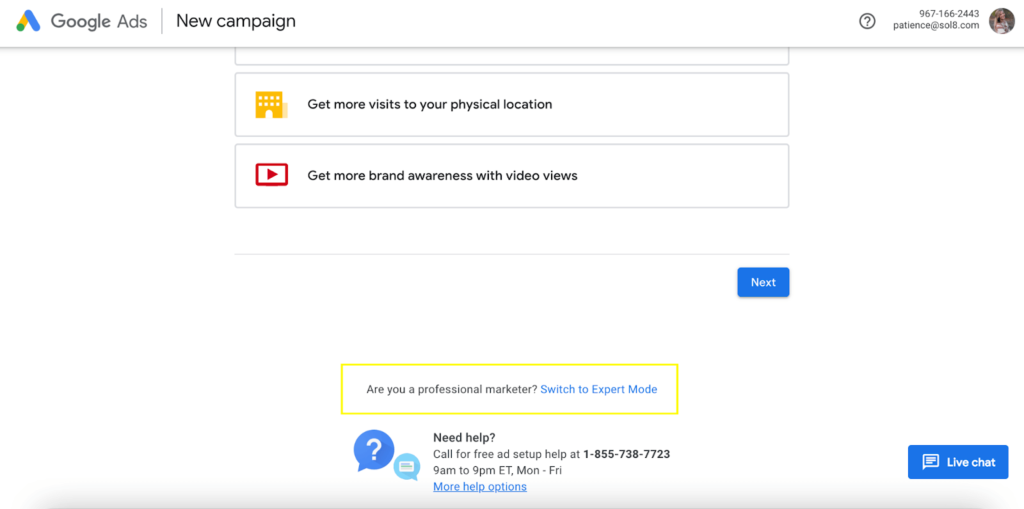
But here’s the thing: If you select any of the goals offered by Google for an easy setup (get more calls, more website sales or sign-ups, or more visits to your physical location), you’ll end up with a scaled-down version of Google Ads:
Think templatized campaign as opposed to a customized campaign.
So, instead, scroll down a bit to the tiny font below that reads, “Are you a professional marketer? Switch to Expert Mode”
☐ Click “Switch to Expert Mode”
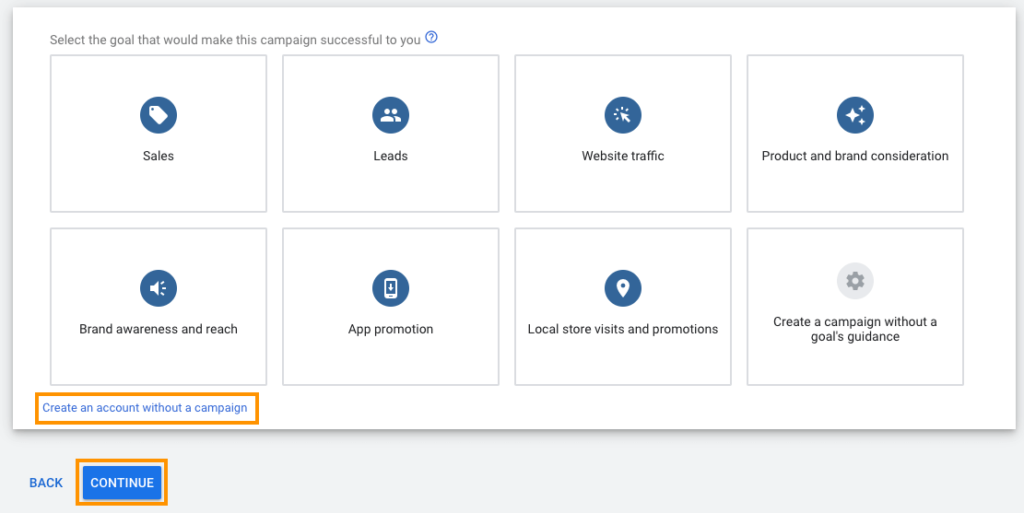
When you click on this, Google will once again try to push you toward a templated campaign, instead of one that is customized to your specific needs:
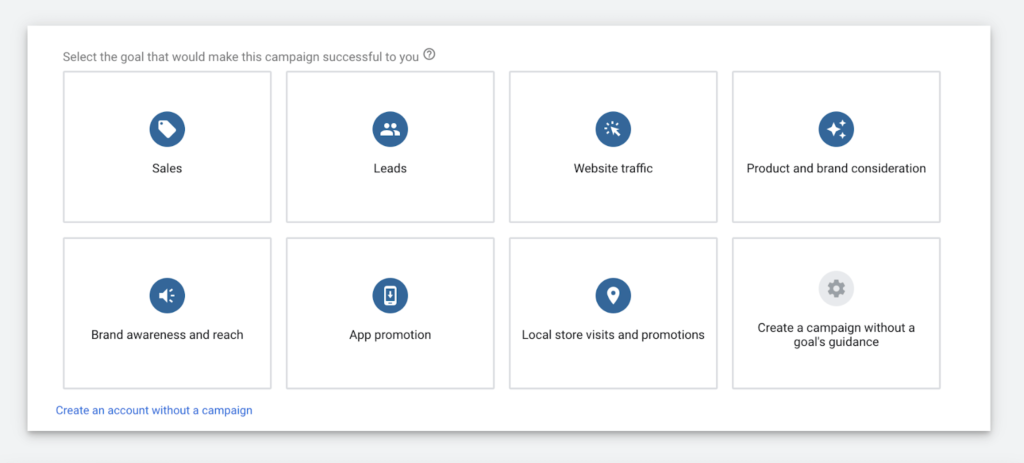
So, looking back to our campaign setup, instead of selecting a specific goal:
☐ Click “Create an account without a campaign”
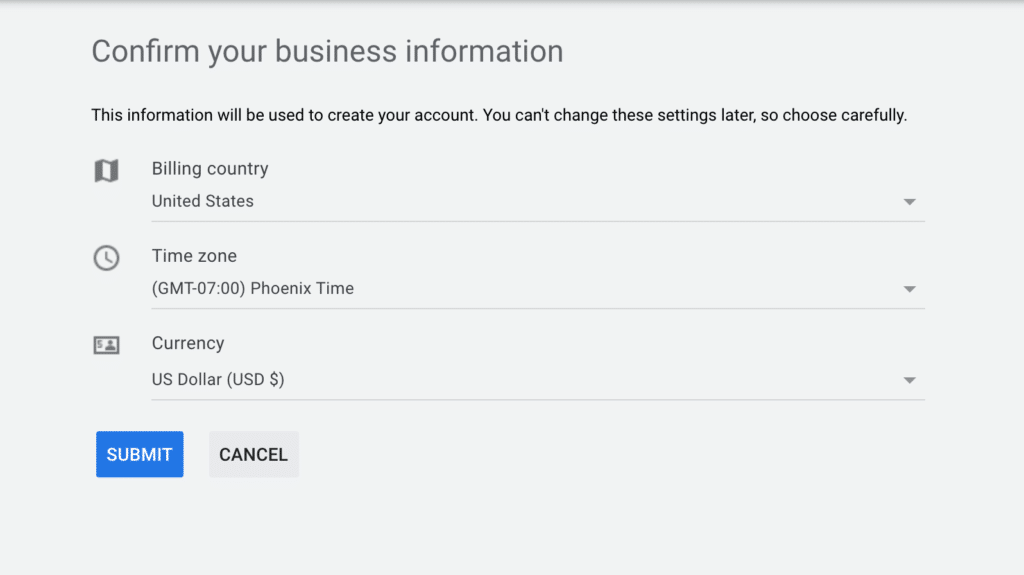
☐ Next, fill out the business information requested, then click “SUBMIT”
☐ Next, click “Explore your account”
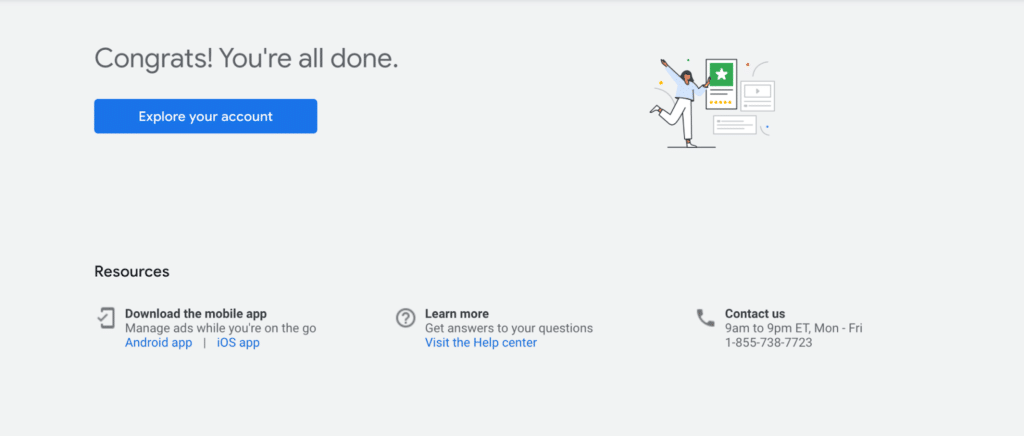
Congrats! Your Google Ads account is set up—but not quite ready to go.
See, during this account setup, Google Ads tried to get you to create a campaign before setting up conversion tracking, which is a problem.
So, next:
☐ Click “Tools & settings”
☐ “MEASUREMENT”
☐ “Conversions”
Now, leave this page open:
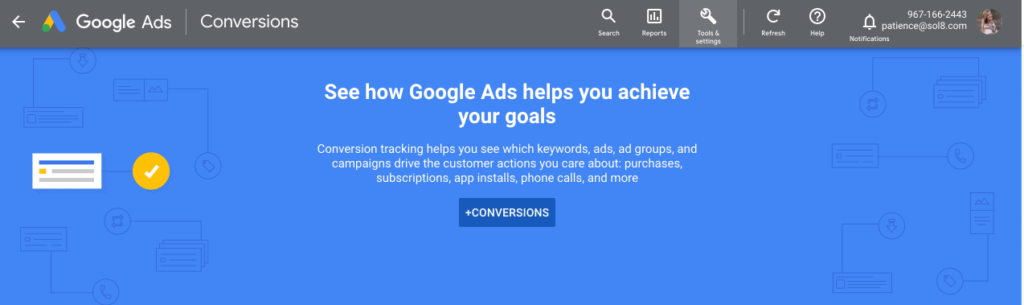
This will prepare us for our next important account setup:
Setting Up Google Tag Manager
We’re going to walk through how to set up conversion tracking in a moment.
But, before we can connect conversion tracking to your account, we need to set up Google Tag Manager.
What is Google Tag Manager?
Google Tag Manager is Google’s free software that allows you to install tracking on your website using a snippet of code to track actions taken on your site, and thus, evaluate the success of your YouTube ad campaigns.
In other words, instead of hiring a web developer to install custom code on your site, Google Tag Manager acts as your personal developer, so you can install codes more easily using the GTM interface.
Here’s how to get set up:
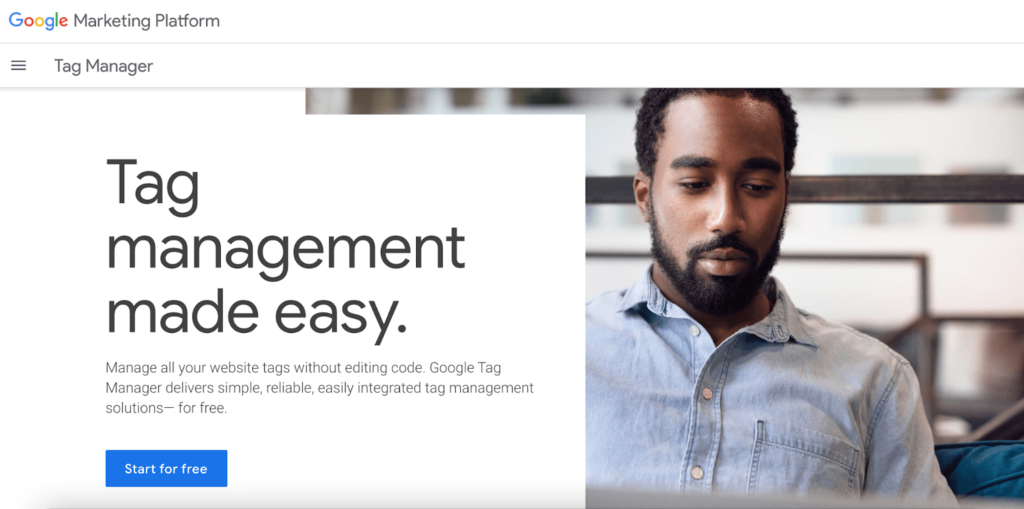
☐ Go to marketingplatform.google.com/about/tag-manage
☐ Click “Start for free”
☐ Create Account
☐ Fill in your account details, including your company name, country, and website URL, and target platform (make sure to select “Web”)
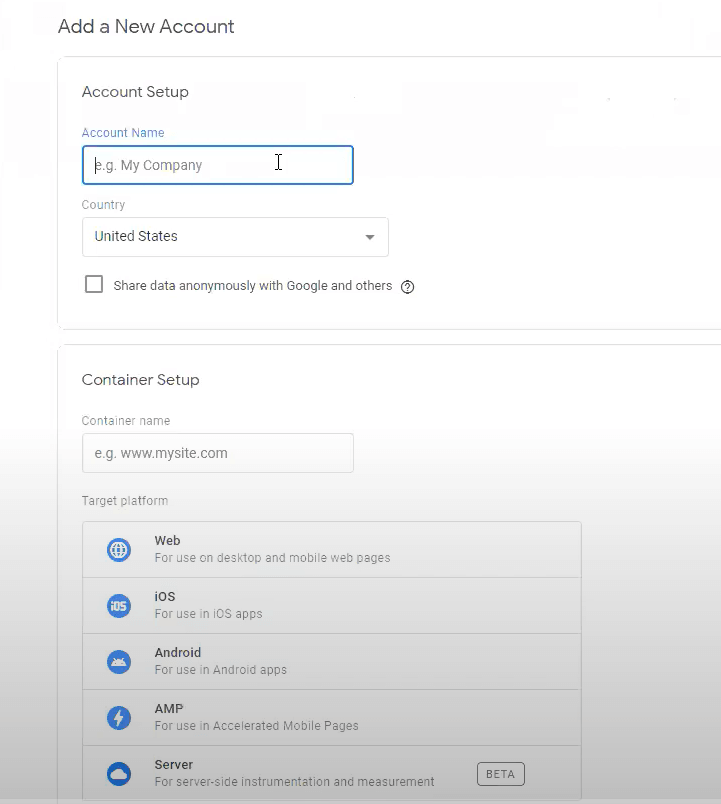
☐ Click “Create”
☐ Agree to Google Tag Manager’s Terms of Service Agreement

☐ Now, leave this tab open (and maybe even save these codes somewhere)
Conversion Tracking Setup
Through Google Tag Manager, Google Ads is able to track every conversion—which is critically important to the success of your campaigns.
This includes conversion actions, such as filling out a form or scheduling an appointment.
Most conversion actions (except for, say, phone calls or chats) allow for their own separate thank you page, which makes tracking these actions easy.
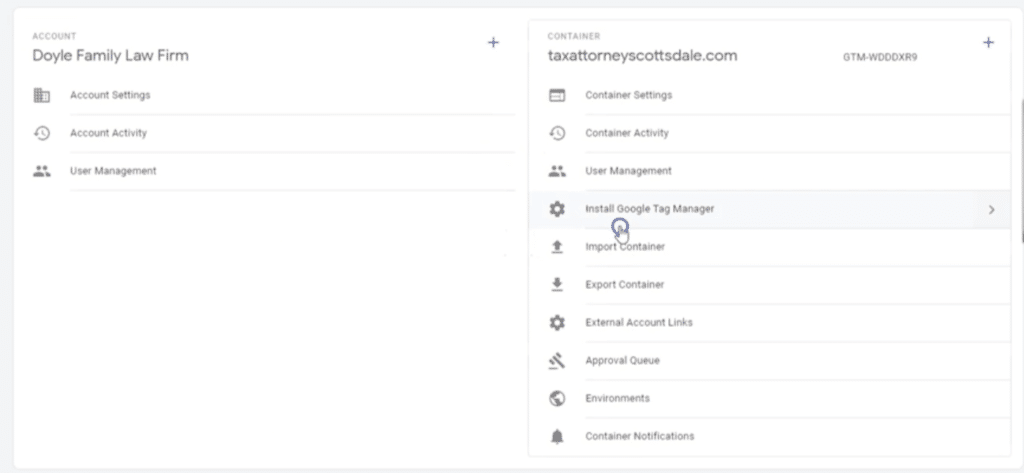
How to Install Google Tag Manager
Every website is a little different. You might be on WordPress, Wix, or Squarespace—so depending on which platform you use, the way you install Google Tag Manager is going to be a little different.
However, it’s *basically* the same across all web applications. So, as we move forward, just note that some of the step-by-step instructions might be a little different for you, but you should still get a solid understanding of how to install GTM:
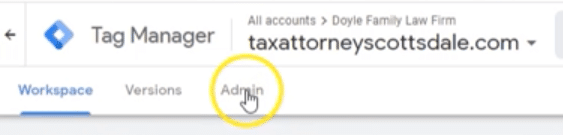
☐ First, if you closed that tab from the step before, head to TagManager.Google.Com
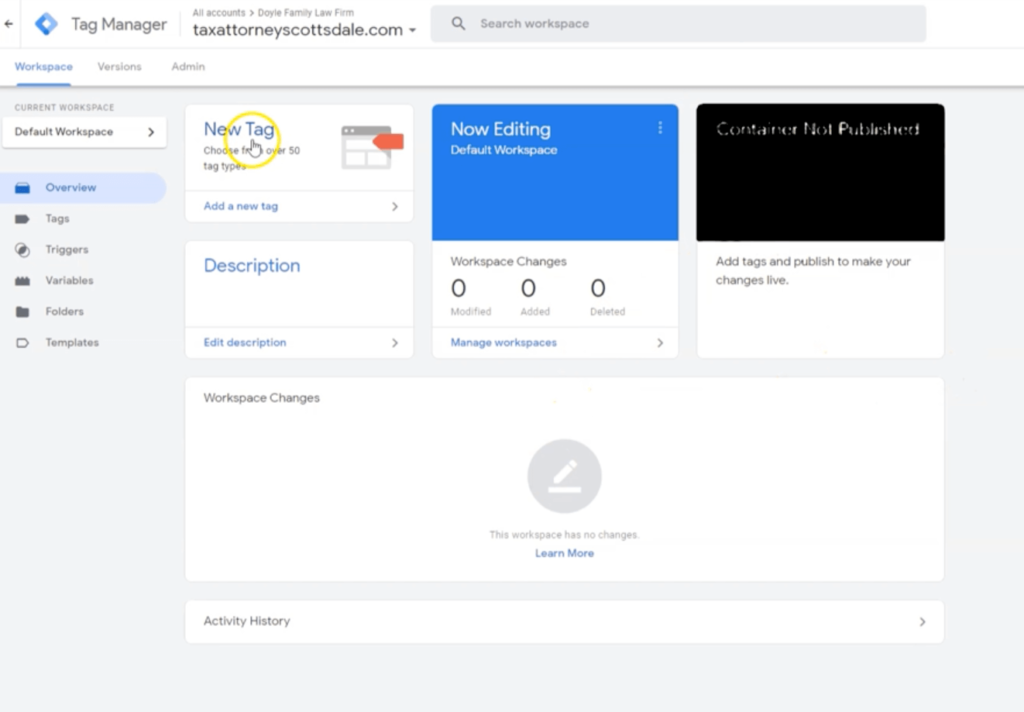
Your codes might be clearly accessible to you on your dashboard, but if not:
☐ Head to the “Admin” tab of your dashboard
☐ Click “Install Google Tag Manager”
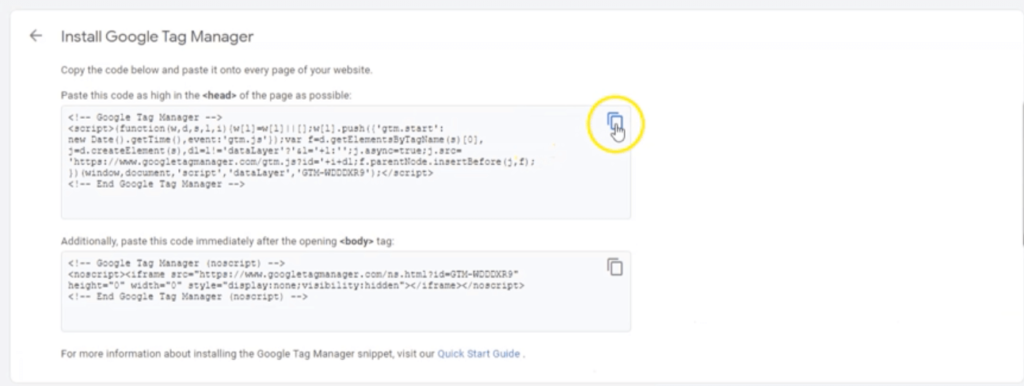
Next, it will show us the code to paste in the <head> tag and <body> tag.
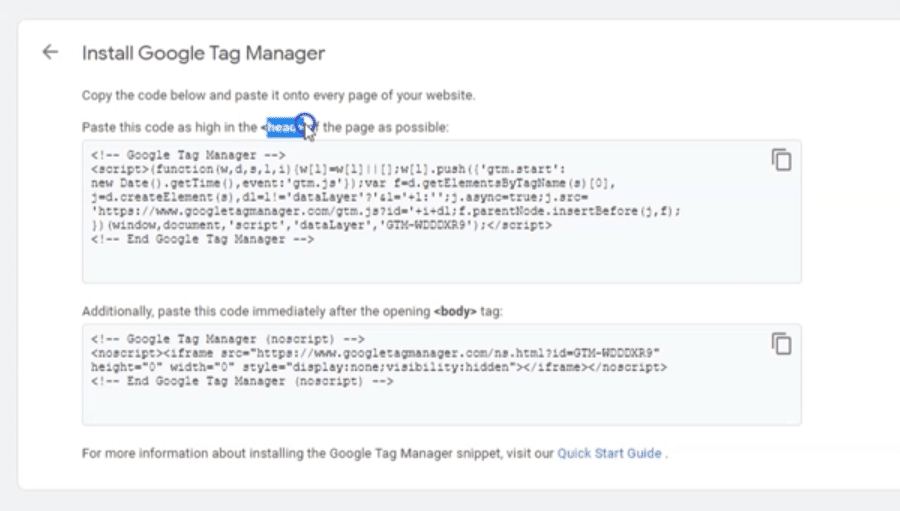
Interestingly, we only need the code provided for the <head> tag for our intended purposes. But we still recommend installing them both, in the event you’d like to dive deeper into Tag Manager in the future.
If you have a web developer, this may be the part where you simply send the two codes over to them to install.
But, if you are doing this yourself, we’ll show you how to get these codes installed.
☐ Head to the backend of your website
☐ For our CMS example, we click on “Settings,” which brings us to a page that includes a box “Head tracking code” and “Body tracking code” (again, your CMS platform may be a bit different here)
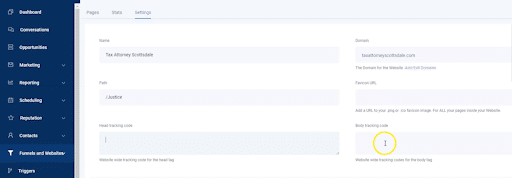
☐ Once you find the right spot to paste your <head> tag and <body> tag, go back to Google Tag Manager
☐ Copy the codes
☐ Go back to your CMS platform and paste the codes—ours looks like this:
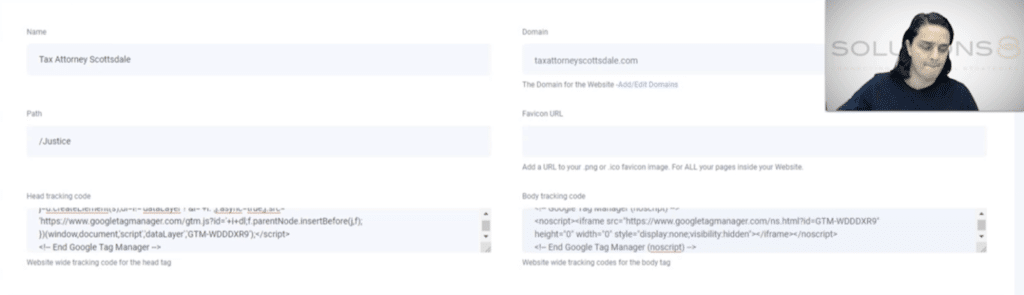
☐ Click “Save” or “Submit” to ensure the <head> and <body> tags are installed
Next, we want to test these tracking codes to make sure they work. We can do this using Google Tag Assistant.
What Is Google Tag Assistant?
Google Tag Assistant is a free Chrome extension that ensures tags on your website are installed properly.
You can download Google Tag Assistant here.
☐ Next, go to the homepage of your website

☐ Click the Google Tag Assistant icon at the top of your browser, a dropdown will appear that should show that Google Tag Manager is installed on the page
Once you confirm that Google Tag Manager has been successfully installed, you can move on to tracking conversions with Tag Manager.
Tracking Website Conversions with Tag Manager
Now that we know it’s installed on your site, we’re going to build conversion tracking inside Google Ads using Google Tag Manager.
First up:
☐ Login to Ads.Google.Com
☐ Go to “Tools & settings” and click “Conversions”
☐ Go to “Tools & settings” and click “Conversions”

☐ Click “Add Conversions” or blue (+) button
☐ Select “Website” conversions
☐ Category
Choose a category that applies most accurately to your conversion action—this can be tricky!
☐ Conversion Name
When naming your conversion, use the following formula:
Page + Action
For example: “Page-Contact>Action-Form”
☐ Value
Select “Don’t use a value for this conversion action (not recommended).”
Ignore Google’s commentary—we DO recommend this option!
☐ Count
Select “One”
☐ Click-Through Conversion Window
“90-days,” i.e. as broad as possible!
☐ Engaged-view conversion window
Select “3 days”
☐ View-Through Conversion Window
“1 day”
☐ Include in “Conversions”
Check the box to include
☐ Attribution Model
Recommended: Time decay
☐ Click “Create and Continue”
☐ Tag Setup
Using Google Tag Manager
In a new tab, go to TagManager.Google.Com and login
☐ Click “Triggers”
☐ Select “New Trigger” and name it so it matches your conversion action (Page + Action)
☐ Trigger Type
Select “Page View”
☐ This Trigger Fires on
Select “Some Page Views”
(Page URL > Contains > use the URL from your thank you page, not the form page!)
☐ Save!
☐ Next, click “Tags” on left hand side of page
☐ Select “New”
☐ Give this tag the same name as your trigger and conversion action (Page + Action)
☐ Click “Tag Configuration”
☐ Select “Google Ads Conversion Tracking”
☐ Fill out the Conversion ID and Conversion Label boxes using the information on your Google Ads account page we left open
*Copy*
*Paste*
☐ Skip the remaining information boxes
☐ Trigger
Select the trigger you built for this conversion (not “All Pages”)
☐ “Save”
☐ “Submit”
☐ “Publish”
☐ Workspace > Preview
☐ Paste URL of conversion action page
…Not the “thank you” page!
☐ Click “Start”
☐ Click “Continue”
☐ Make sure no tag has fired (but there should be a tag!)
☐ Go back to your conversion action page and fill out your form (if that is your conversion action)
☐ Go back to Google Tag Assistant to make sure tag fired after you submitted your form
Woohoo! Success!
Now, you can go in and add your remaining conversion actions.
Creating Your YouTube Channel
If you didn’t have a Google account before, you now have one after creating your Google Ads account, which you’ll use to create your YouTube channel:
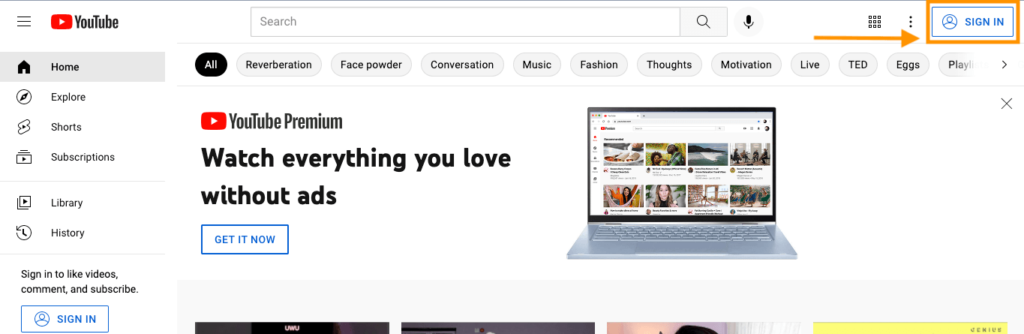
☐ Go to https://www.youtube.com/
☐ If you’re not logged in, click the “Sign In” button on the upper right corner of your screen.
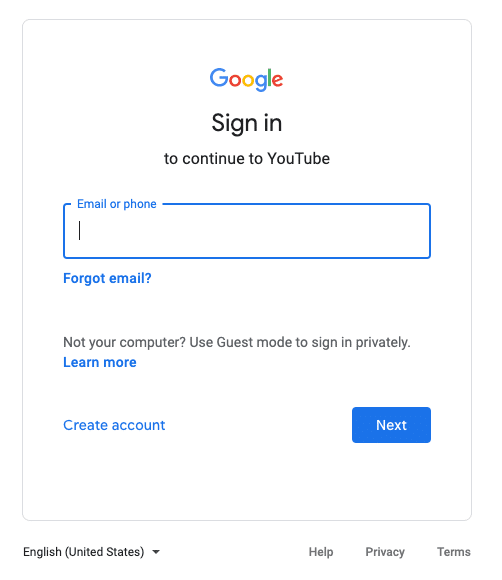
☐ Sign in to your Google account using your email address (Gmail) and password.
☐ Once you’re signed in, click the “profile” button on the upper right corner of your browser.
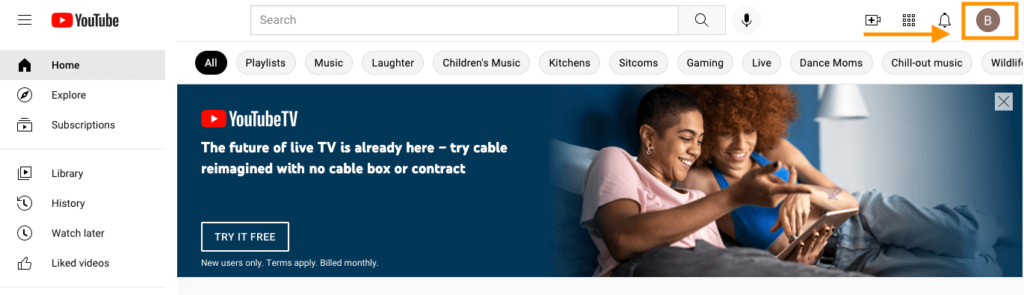
☐ Select “Create a channel.”
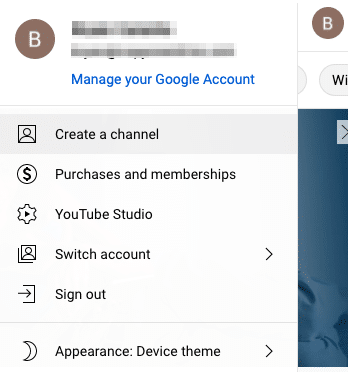
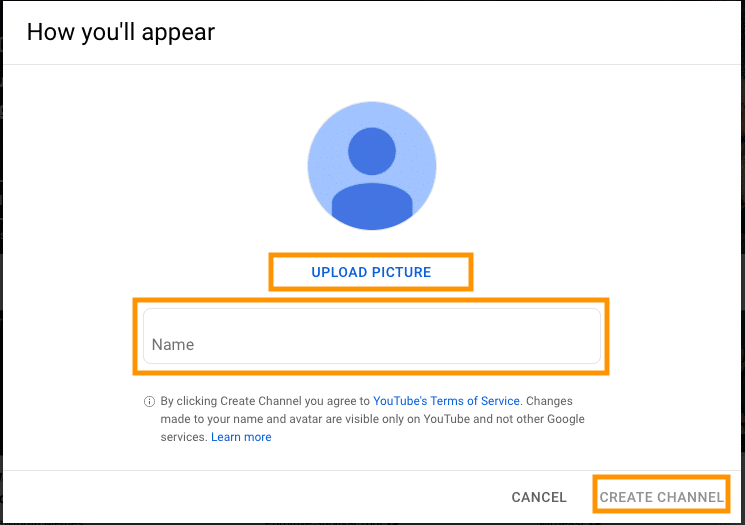
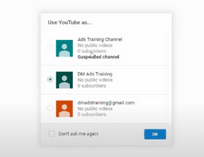
☐ You’ll be asked to upload a profile picture (optional) and enter your channel’s name. Once you’re finished, click “Create Channel.”
Done! You now have your own YouTube channel.
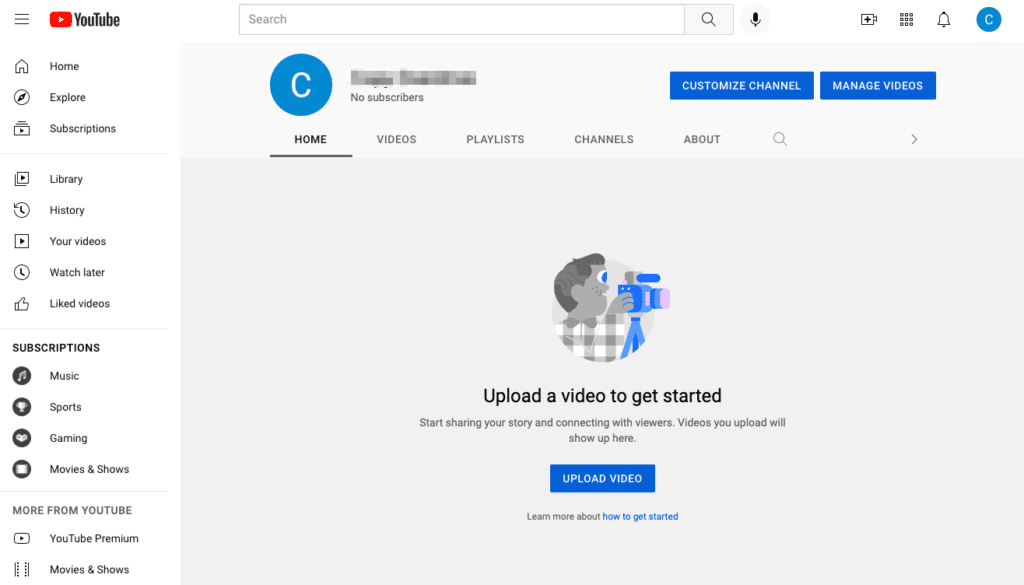
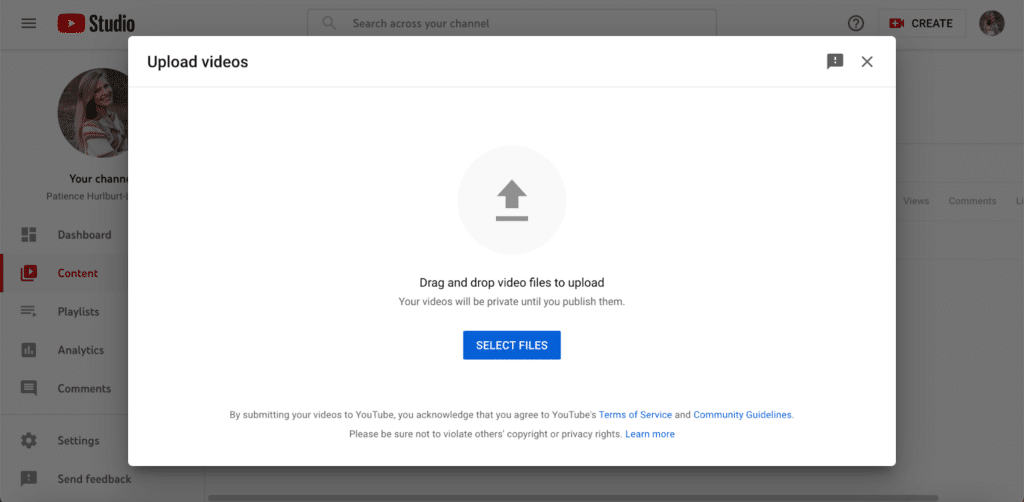
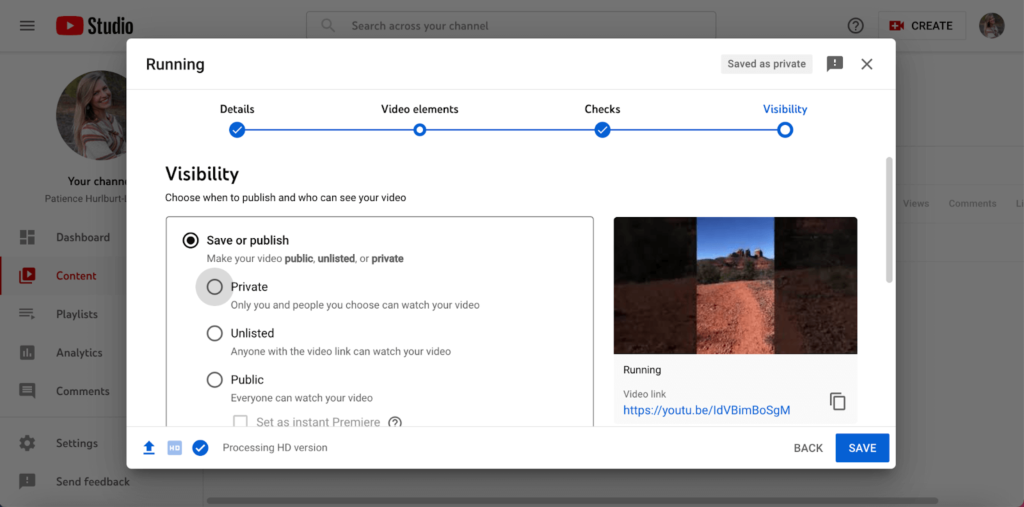
How to Add Videos to Your Channel
- YouTube.com > Upload Video
2. Select File
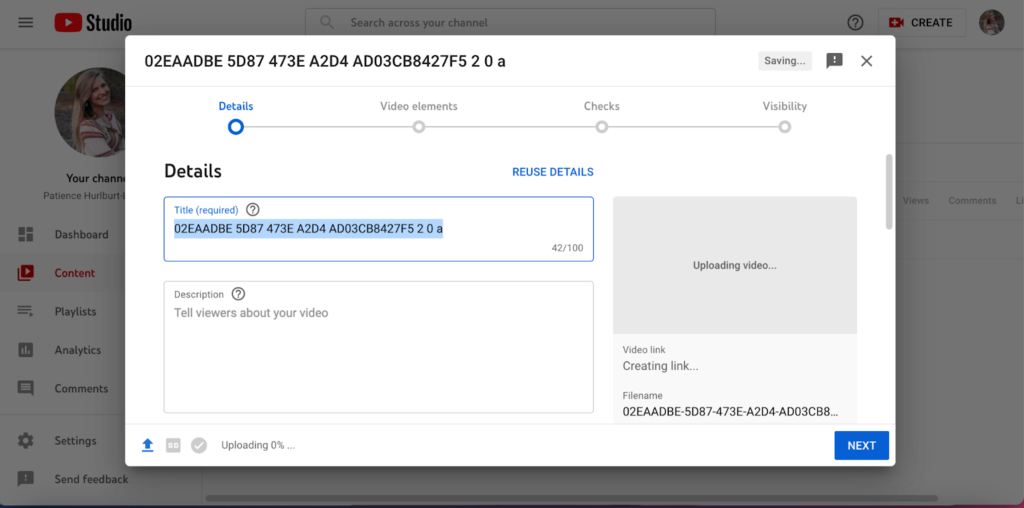
3. Add Title and Description
And fill out the remaining fields
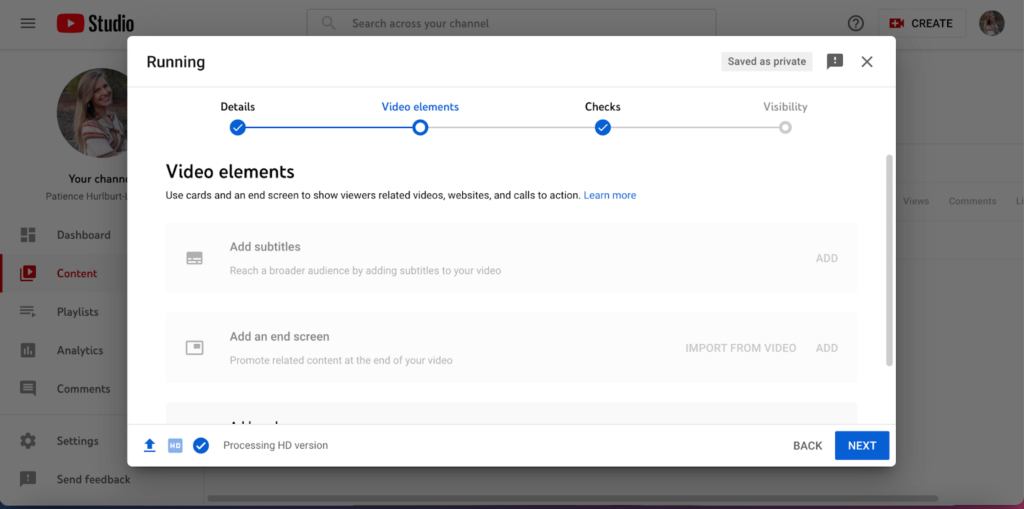
4. Add any video elements
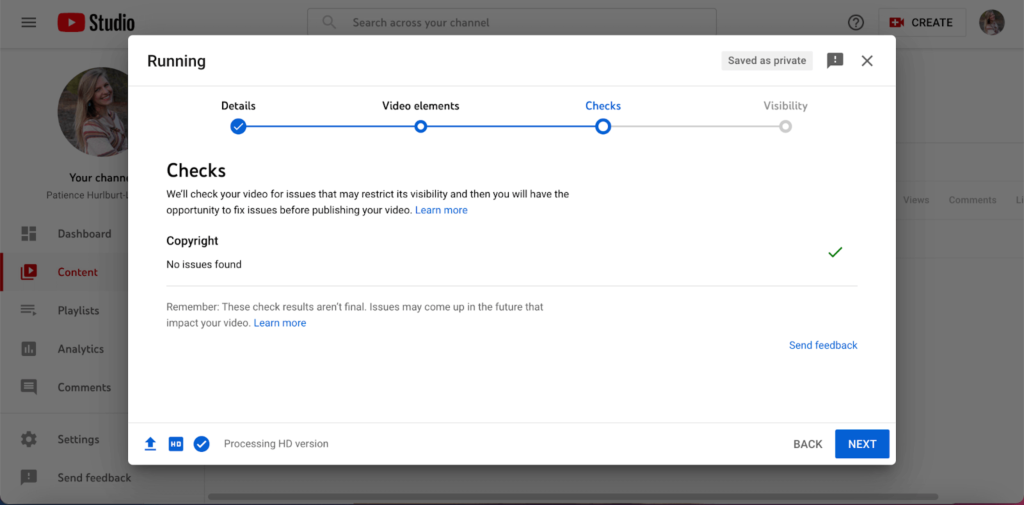
5. Check copyright and visibility issues
6. Publish
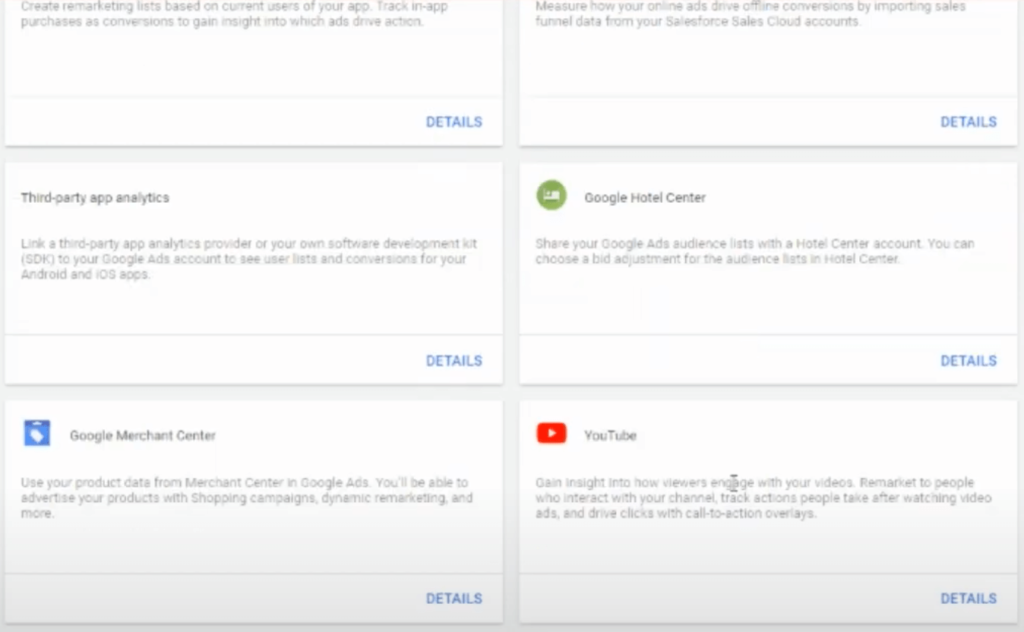
Connect Your Google Ads and YouTube Account
How to Connect Your Google Ads Account and Your YouTube Channel So You Can Run Video Ads!
Okay, now that we have our Google Ads account and YouTube account set up, it’s time to connect the two.
As a reminder, video ads run through the Google Ads dashboard—but, Google Ads relies on YouTube to house the videos.
So, we set up and run YouTube ads from Google Ads’ dashboard, but draw upon YouTube’s library of videos for the content itself.
Let’s get connected:
☐ Inside your Google Ads account, go to “Tools & Settings”
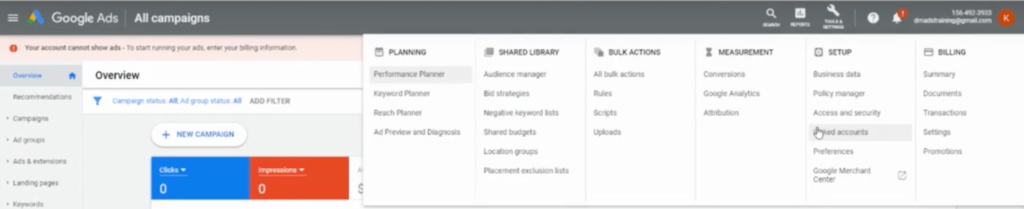
☐ Scroll down to “Linked Accounts”
☐ Select the YouTube “Details” button
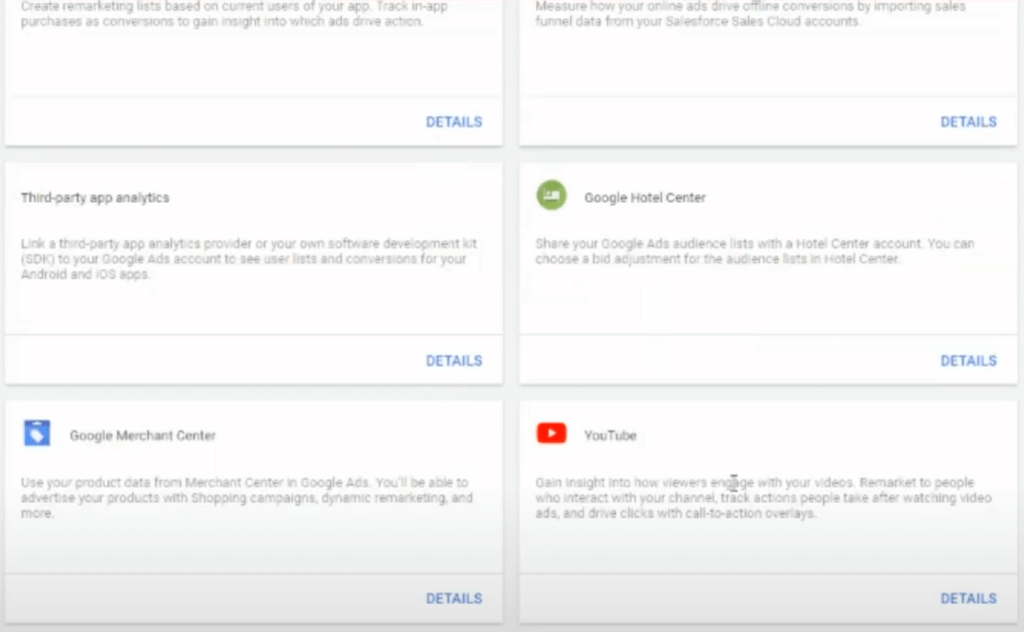
☐ Select “Add channel”
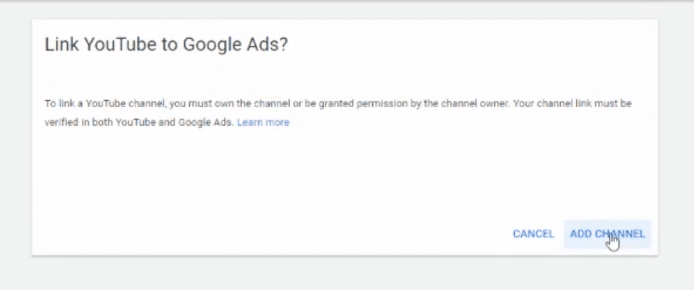
☐ Add your YouTube channel’s URL
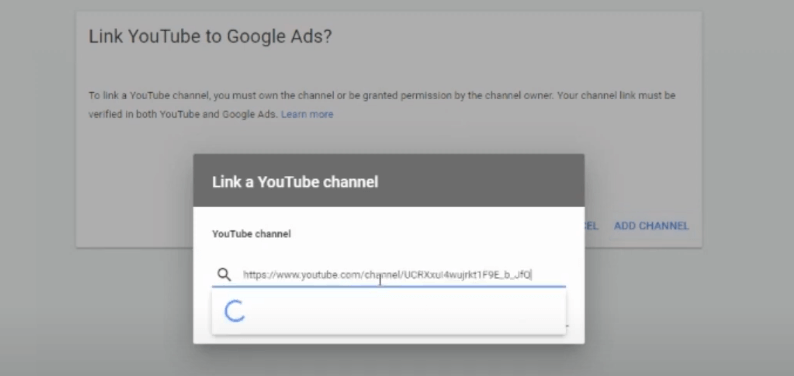
☐ Select the channel owner
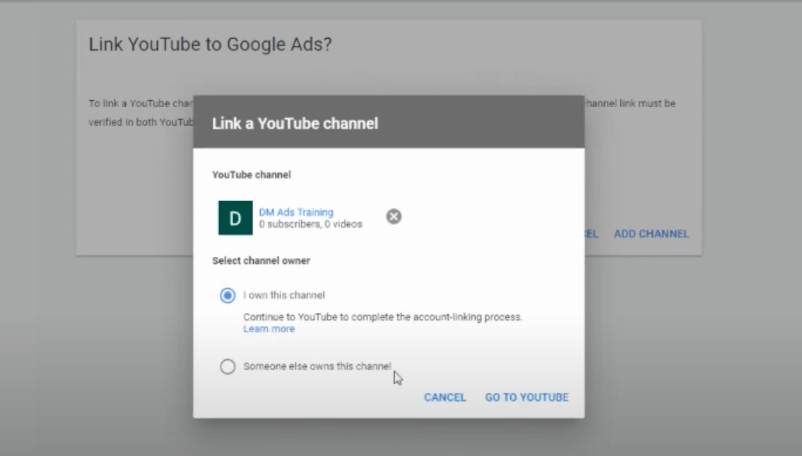
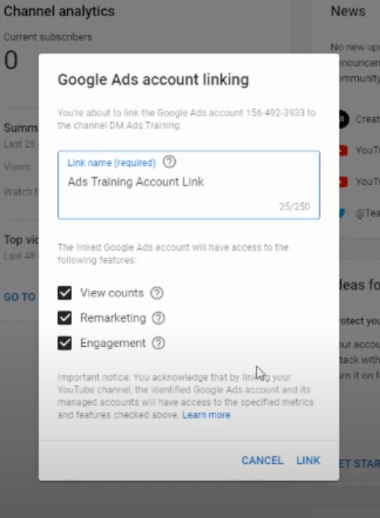
☐ Select “Go to YouTube,” which will open YouTube’s third party verification
☐ Select the channel you want to use for your ads and hit “OK”
☐ Name the YouTube’s account name for inside of Google Ads
☐ Click “Link”
☐ Go back to your Google Ads dashboard, which should still be left on “Linked accounts” and refresh the page
You should now see your linked YouTube channel!
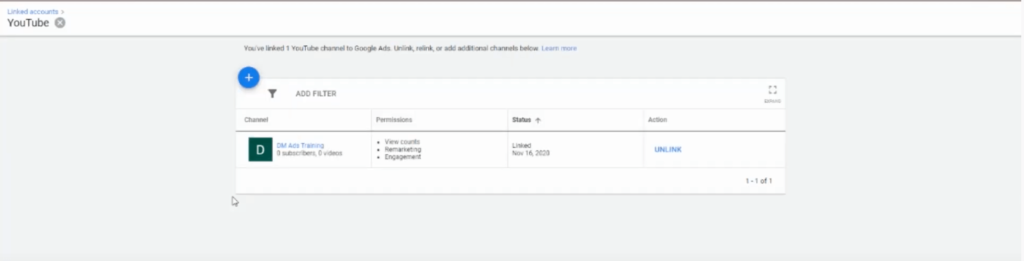
If you have multiple YouTube channels, you can link them all.
Part Seven
General Campaign Setup
How to Create a Lead Generation Campaign
Creating Your Video Ad
Skippable In-stream VS Non-skippable In-stream: Our Recommendation
Creating Custom Audiences
How to Add Audiences at an Ad Group-Level
Negative Keywords
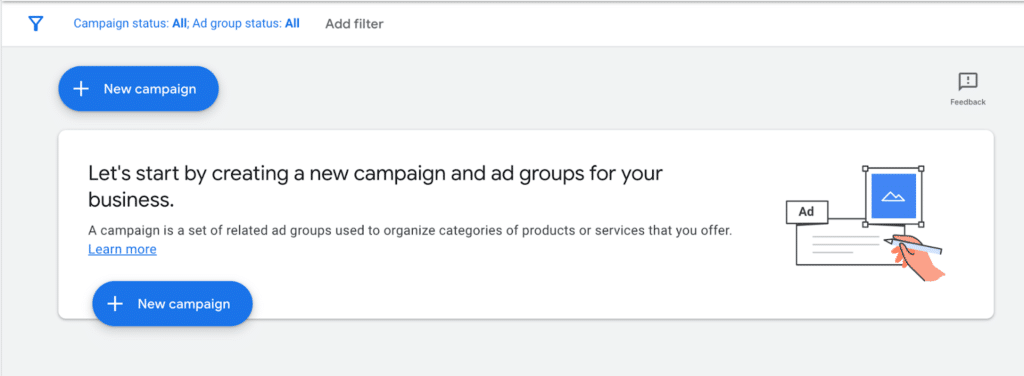
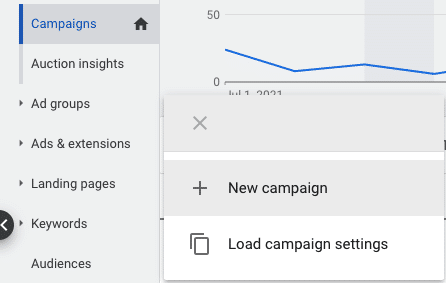
Now that you have videos uploaded to your YouTube channel, it’s time to build your YouTube ad campaign inside Google Ads!
How to Create a Lead Generation Campaign
To start, just go to your Google Ads Dashboard, click campaigns, then click the “+” symbol to add a new campaign.
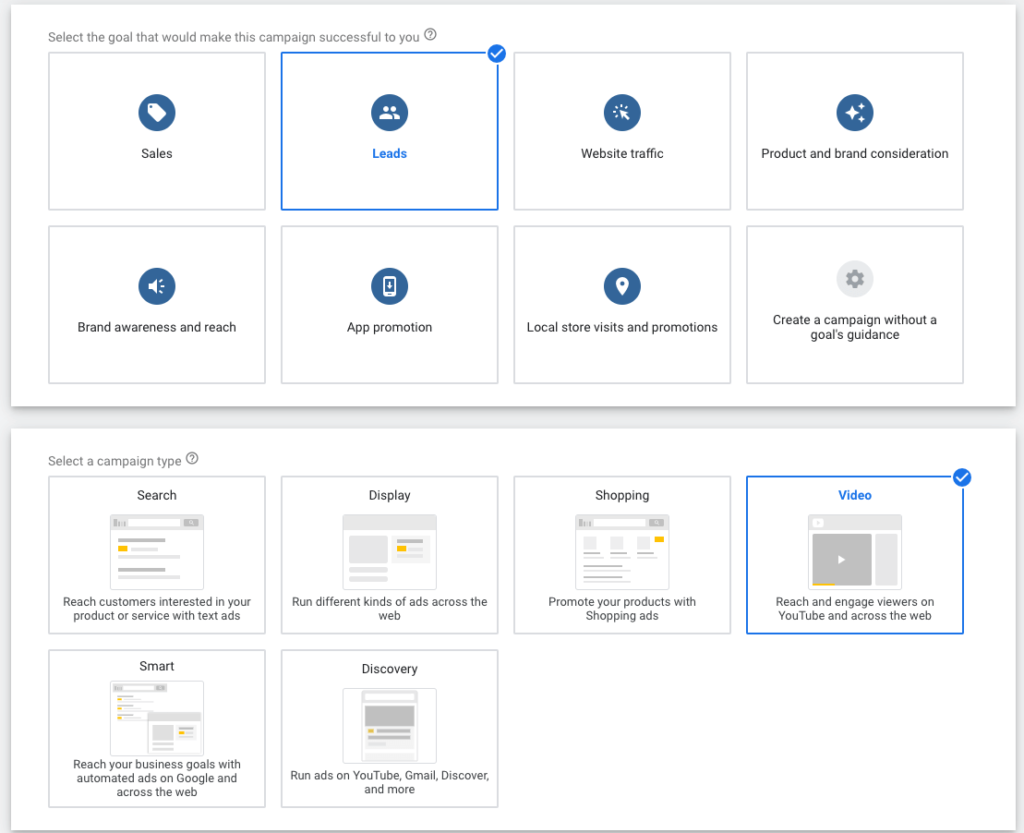
You’ll be prompted here to “select a goal that would make this campaign successful to you”
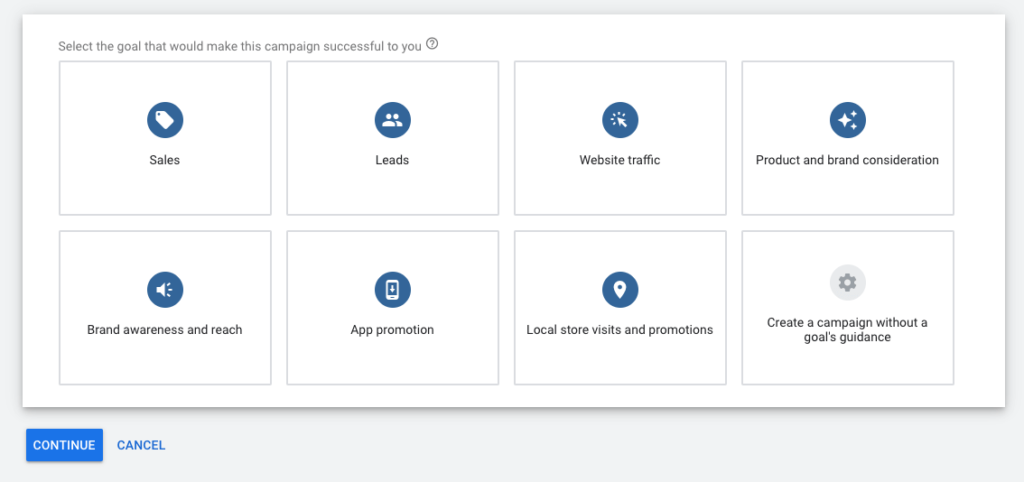
Selecting Your Goal and Campaign Type
Here’s the thing.
Depending on which goal you choose (sales, leads, website traffic, etc.) for your video campaign, Google will make either an executive decision or offer up more options and features for your campaign.
For example, if you choose “Sales” as your goal (followed by “Video” as your campaign type), Google automatically assumes you’ll want to focus on driving conversions.
But, if you choose the goal “Brand Awareness” and the campaign type “Video,” you’ll get a whole slew of options like:
- Skippable In-stream
- Bumper
- Non-skippable in-stream
- Outstream
- Ad sequence
This is Google’s way of putting training wheels on your campaign.
In the past, Google limited your options if you selected a goal.
But now, Google limits your options if you don’t select a goal (they won’t tell you what other options you have).
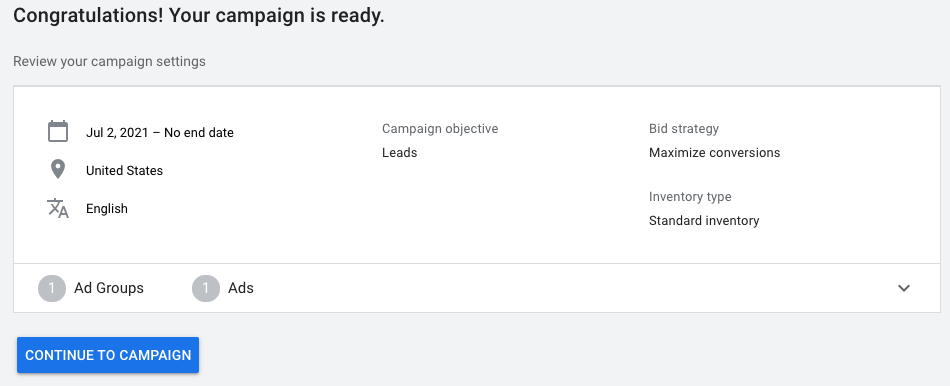
Since this is a Lead Generation Campaign for YouTube, here are our recommended settings:
- Choose “Leads” as your goal
- Choose “Video” as your campaign type
We have had better performance with this goal guidance than anything else.
Create Your Campaign

Start by entering your campaign’s name. Choose a name that’s relevant and easy to remember.
Next, if your campaign is at $50,000 in lifetime spend, you probably need to use Lead Forms.
If you don’t have them, it’s not a deal-breaker. Just leave it blank for now.

Want to use Lead Forms? Check out our blog on how to use lead forms inside YouTube ads here.
Bidding Strategy
Select Maximize conversions first.
The only time you need to use Target CPA is when you have achieved around 10 conversions.
Why?
Because your conversions will tell you how much your Target CPA should be.

Pro tip: Add 10% buffer to your target CPA.
If your conversion is $50, then your Target CPA should be $55.
From there, you should decrease your CPA by 10% every week (or two) as long as:
- Google is meeting those CPAs
- Impression rates aren’t dropping
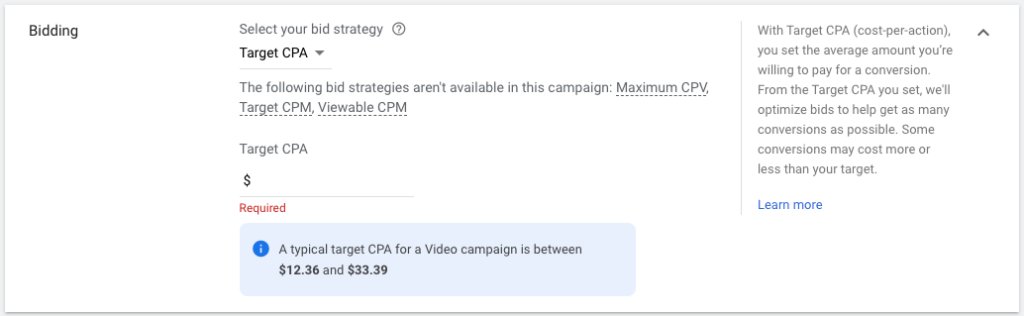
This strategy helps you find the Target CPA that works for you, so you can scale as efficiently as possible.
Budget and Dates
We recommend you spend $20.00 daily–a pretty aggressive budget for video.
While you’re not necessarily paying for “view,” the scope of what you’ll get from this budget is worth it. However, if you need to go lower than that, it’s totally fine.

But watch out.
Some marketers will tell you to go for as low as $1.00.
Don’t do it.
It’s not going to get you the conversions you need–especially if you’re in a competitive industry.
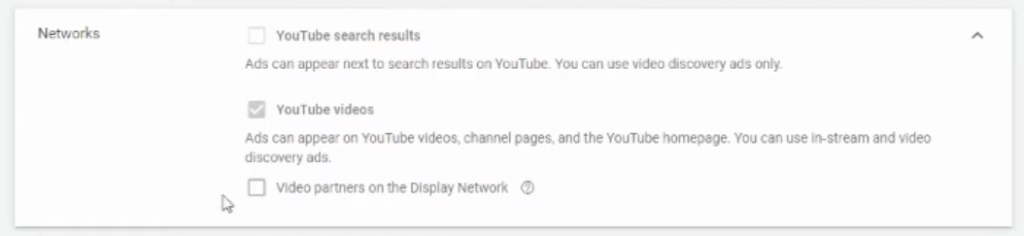
Networks
Uncheck “Video partners on the Display Network.”
We’re going to choose the exact sites you want your ads to show inside of Placements. And you’ll learn that once we’re in the Creating Your Ad Group section. For now, only check “YouTube videos.”
Locations and Language
For locations, we always leave it to “United States.”
However, if your target is outside the U.S., you can set a different location by selecting “Enter another location,” just type the country you’re targeting.

To make sure that you’re effectively on channels that use the English language, set Languages to “English.”
Locations: United States (you can enter another location too)
Language: Keep it in English to make sure you’re on English channels.

Content Exclusions: Inventory type
In this section, Google asks you to choose an “inventory” that your ads belong to.
Each category dictates how explicit your content is. Our recommendation is to choose “Standard Inventory,” unless you have a product or brand that specifically distinguishes you into an Expanded or Limited Inventory.
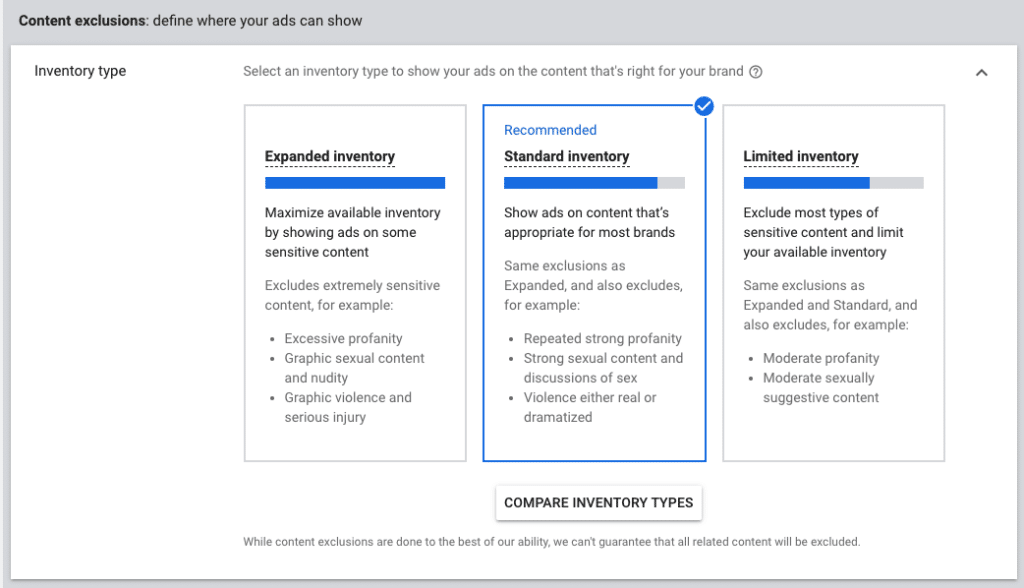
Not sure about which category you belong to? Here’s a quick guide to help you decide:
Expanded inventory. Only use this if your content actually lives in this targeted niche. (e.g an “aggressive” clothing brand)
Standard Inventory. Same exclusions as expanded but less explicit. This is what we recommend.
Limited Inventory. This excludes most types of sensitive and explicit content. (e.g. churches, kids, family, etc.)
To learn more about inventory types, click on “Compare Inventory Types.”
Content exclusions: Excluded types and labels
This is important. The reason we recommend opting out from Embedded YouTube videos is because you might not want to show up on someone else’s website–it conveys a different intent and there’s a lower probability to convert those users.
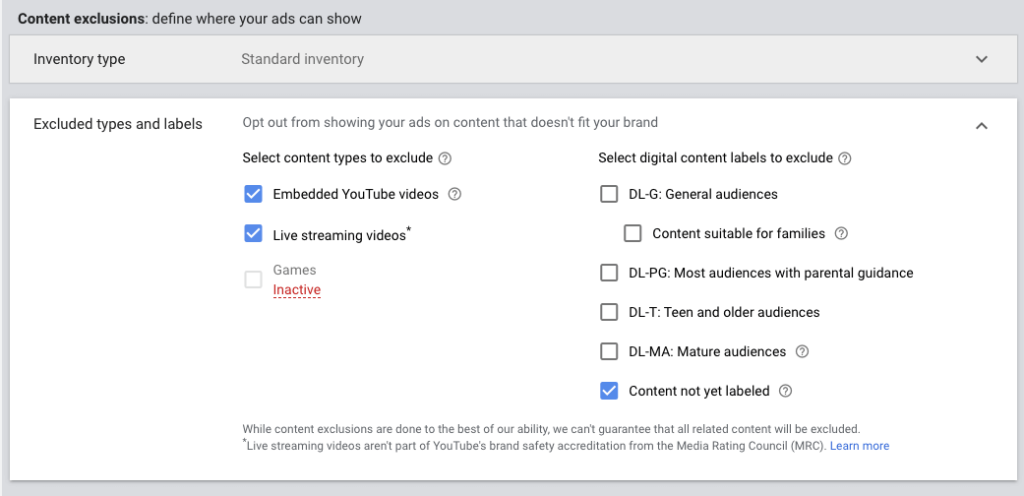
We also recommend you to opt out from live streaming videos, and here’s why:
If someone’s watching a live video, they are probably highly engaged in it which means they’ll be less likely to convert.
Does this mean that you should always opt out from showing your ads on specific websites or live streams? It depends on your goals. But the goal of this is to show up inside of the YouTube machine while the user’s intent has not changed yet.
Now, with the excluding digital content labels, it’s up to you to decide if you want to exclude yourself from the specific “ratings.” You can always just leave everything out and just check “Content not yet labeled.”
Ad Extensions
One of the most important ad extensions is the Sitelink extensions. These are hyperlinks that when clicked, take the users directly to your website or landing page (e.g your product page) and can significantly increase your conversions.
If you have no idea how to set it up, watch our full step-by-step tutorial on how to use sitelink extensions here.
Additional Settings
There are four additional settings inside a lead generation campaign–conversions, devices, frequency capping, and ad schedule. These settings help Google identify where exactly should people see your ads and how often.
Conversions
If you have multi-variant conversion settings, multi-touch points, or different conversions you want to track for this campaign, click “Choose conversion actions.” Otherwise (and in most cases) just use the account-level conversions.

Important: No matter what you do, make sure you’re tracking conversions.

Devices
Exclude TV screen and only keep Computers, Mobile, and Tablets on.
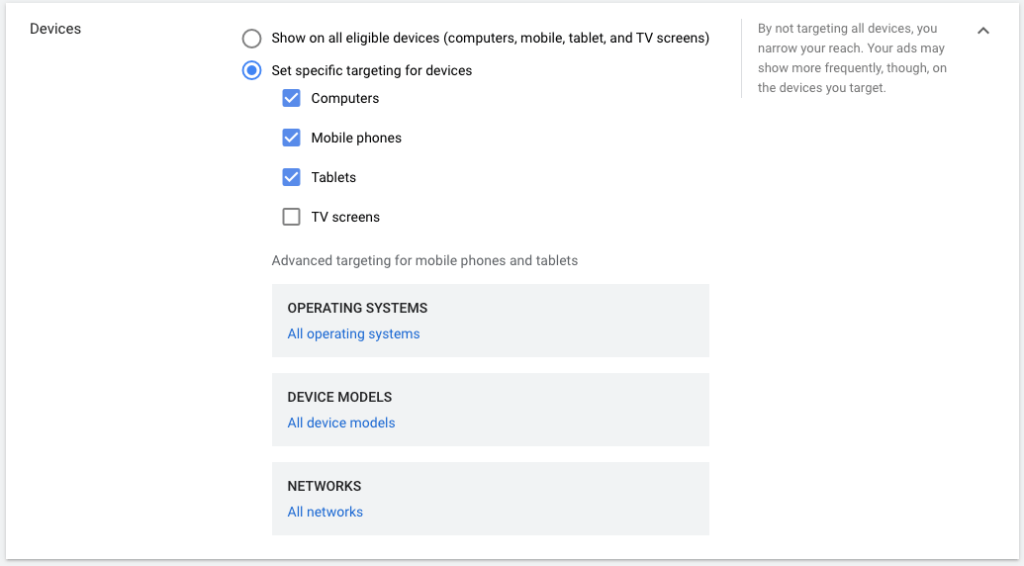
But… shouldn’t I be showing ads on TV screens?
Good question. It might be counterintuitive to deselect that option, but here’s the thing.
People don’t interact with TVs the same as they would with the other three devices. Meaning, users are less likely to take action because TVs have limited capabilities. For example, you can’t take them to your landing page.
So if you need visits and searches, TVs are out of the question.
Frequency capping

Whether it’s Cap impression frequency or Camp view frequency, setting up a frequency cap gives you a broader reach–which works well for a brand awareness campaign. But since this is a conversion-based campaign, we recommend that you leave them both unchecked.
Ad Schedule
You might be tempted to add a specific schedule–don’t. Just set it to “All day.”
Create your ad group
You can split your ad group by offer, by approach, or by target audience.
Remember, Google wants five videos inside an ad group to split-test against each other.
Demographics
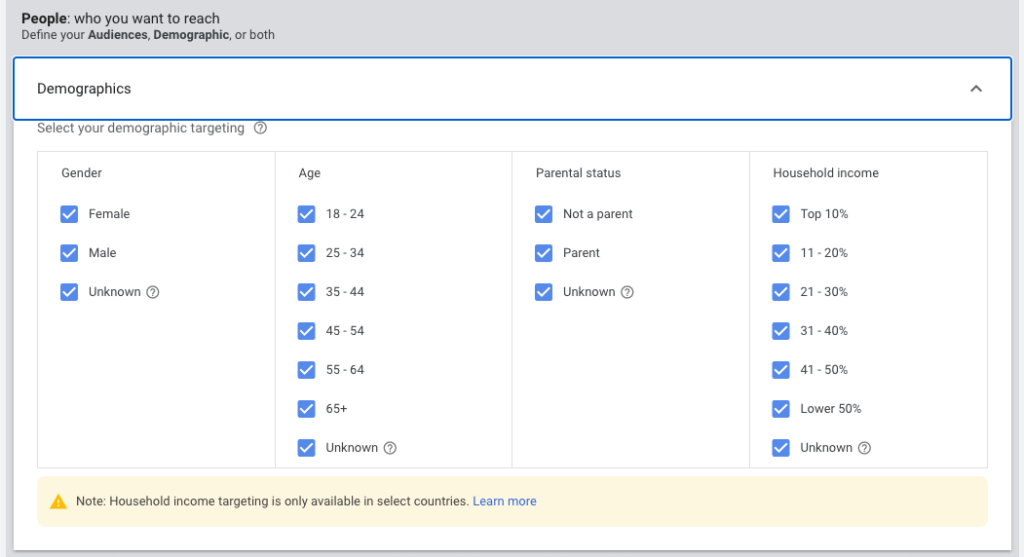
Here, you’ll see a lot of options to select your demographic targeting: gender, age, parental status, and household income. We won’t touch this because we haven’t seen how front-end demographics segmentation helps a campaign.
So, it’s best to leave it to its default setting.
Audiences
You could set audiences here if you want, but we’ll show you a better way—so it’s best to leave this for now.
Same goes with Keywords, Topics, and Placements.

Creating Your Video Ad
At this point, you should have already created your video. So now, it’s time to turn that video into a video ad.
Just grab the YouTube video link and paste that link in the “Your YouTube Video” section.

Skippable In-stream VS Non-skippable In-stream: Our Recommendation
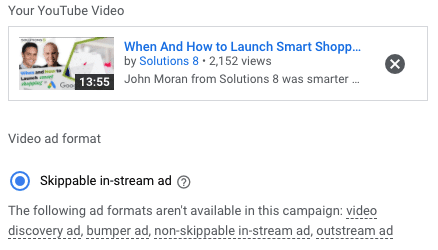
Skippable in-stream and non-skippable in-stream are the most commonly used campaign subtypes.
Skippable in-stream allows you to see how people engage with your ads.
This is what we recommend.
With this option, you only pay if they continue watching the ad for 30 seconds (or the full duration, if it’s less than 30).
What’s even more awesome is if your audience decided to “Skip Ad,” your brand still had a good few seconds of exposure–and that stays with them! The best part? It’s free.
What about Non-skippable in-stream? Just like the term suggests, these are ads that people cannot skip at all. It’s best used if you need to have your audience watch your entire ad.
But be careful. It’s impossible to gauge your audience’s engagement and ad relevance because in this setting, everyone is “forced” to “engage” in your ad.
Only use it if your goal is to maximize your reach.
It’s a good strategy to check the options available in each goal and campaign type first, before you decide to continue.
We highly recommend using in-stream ads because they’re the type of ads that stick.
Display URL and Final URL
Next, don’t forget to add the page you want users to land on once they click your ad in the “Final URL” and not in “Display URL.”
Here’s the difference:

The Display URL doesn’t have to be real. But it has to be relevant to what your offer is on your landing page. This helps to increase trust and click-through rates.
You’ll also be prompted to add a call-to-action (CTA).
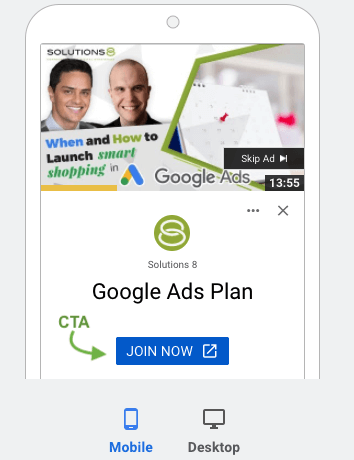
Use a CTA that tells the users how you want them to engage and what’s the next step for them. Here are some of the most commonly used CTAs:
Join
Purchase / Buy
Register
Order
Pay
Shop
Apply
Sign-up
Download
Call / Contact
Headline
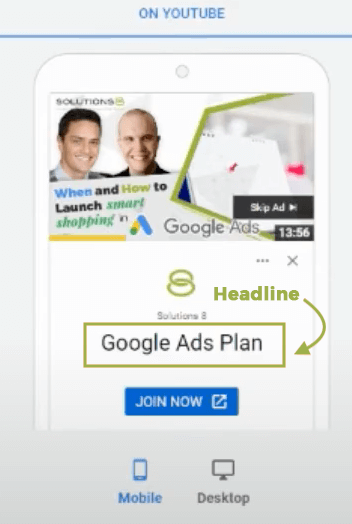
Another biggie when it comes to creating your ad. Keep in mind that your headline should describe what your offer is or what your users are going to get. However, unlike headlines on a regular responsive ad, this headline can only use up to 15 characters.

Being creative and intentional will help you come up with the best headline for your ad.
Ad URL Options (Advanced)
These are advanced options for tracking. If you know how to use them, feel free to set them up. If not, it’s okay to ignore them for now.
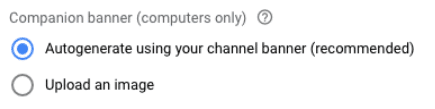
Companion banner (computers only)
The last option we advise you to select is “Autogenerate using your channel banner (recommended).” This setting lets Google create the ad for you instead of uploading an image. Most of the time, uploading an image hurts Google’s responsive display capabilities.
And now you’re ready! Just enter your ad name and click “Create Campaign.”
One last thing before we dive into creating your custom audiences. Make sure that you have at least 5 videos. All you have to do is create a campaign (again) for each video.
The good news is you already have created one. Just repeat the steps by following the previous walkthrough and you should be able to finish them all in no time!
Creating Custom Audiences
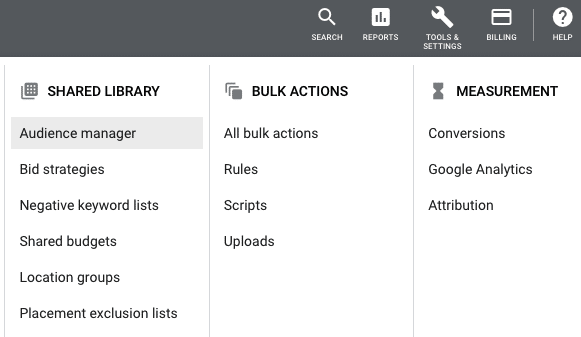
As promised, we’re going to create custom audiences that will give you more control over the type of audience you want to reach. Let’s dive in!
To start, in your Google Dashboard, Go to Tools > Audience Manager > Audience lists > Custom Audiences > click the “+” symbol and add an audience name.
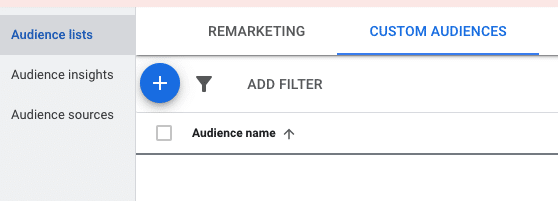
This is where the magic happens. You’ll be given a couple of options to choose from but before we pick one, it’s important to understand what each option can do for you and how you’ll benefit from it.
People with any of these interests or purchase intentions
Using this option, you can add interests or purchase intentions about your service, products, or niche. Google will recommend some search terms related to the words you type in based on intent. Plus, you’ll be able to see the market size available to you.
People who searched for any of these terms on Google and People who browse websites similar to
If you want to get even more specific, you can target people who have searched for any specific terms. This stuff is crazy!
Think about it.
You can target your competitors and tell Google exactly who you want to get in front of!
All you have to do is type in the URL (or search terms) of your competitor and you’ll be able to target anyone who’s gone to that specific website.

Just make sure that you target one competitor per ad group. Having multiple competitors (multi-variant targeting) inside of the same ad group won’t give you the best results–it’s hard to identify what’s working or not.
So, competitor-a.com should be in one ad group and competitor-b.com should be in another ad group.

Pro tip: Find the login page of a website, and use that URL. For example, if you’re targeting a website built in Shopify, you use their specific Shopify URL instead of just “Shopify.com.”
People who use apps similar to and People who visited these places
Aside from search terms and websites, you can also target people based on the apps that they’re using and the places they visited. Just search for the app by typing its name and it will populate results that match the app.
Similarly, to find places people visited, just type a product or service and Google will give you results that match the type of places relevant to the product or service. For example, if you’re targeting “chiropractors,” you’ll see a drop down list of options like Beauty & Wellness Locations, Spas, Massage Therapists, etc.
Once you’re finished, don’t forget to click “Create” to save the audience.
How to Add Audiences at an Ad Group-Level
There’s nothing wrong with adding audiences at a campaign-level. But since we’re targeting audiences based on ad groups, then we have to create the audience inside that ad group.
Here’s how to do that.
First, inside Google Ads dashboard, select the video campaign you created–it should be on the far left side under “all campaigns.” Next, click “Ad groups” and select the ad group you’ll be using.
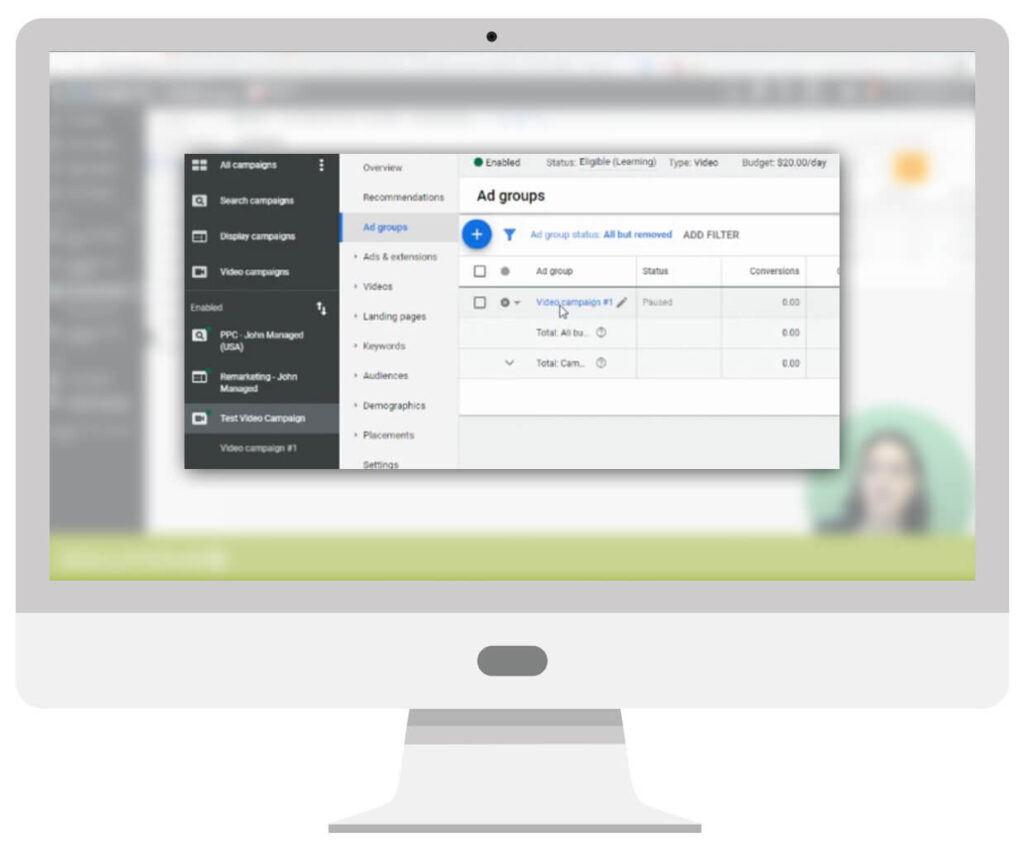
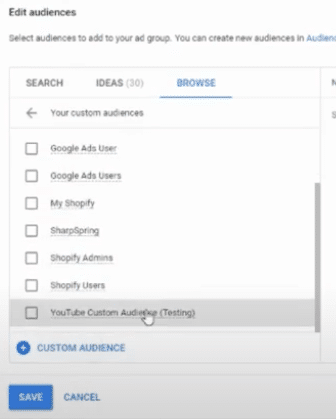
The ad group we created in this tutorial is called “Video campaign #1.” Once you found your ad group, select it. Then, go to “Audiences” and click “Add audiences.”
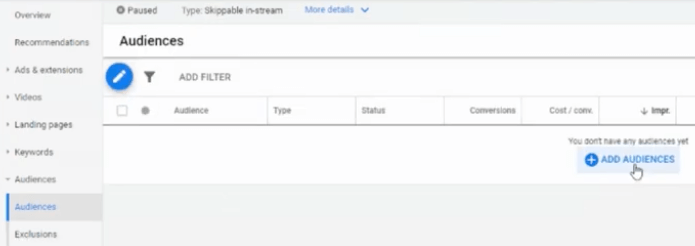
What you’re looking for is the “Your custom audiences” in the “Browse” tab. There you’ll see the custom audience that you previously created, hit save.
Now, you have successfully added your custom audience under the ad group-level. The next thing to do is to add negative keywords.
Wait… Negative keywords?
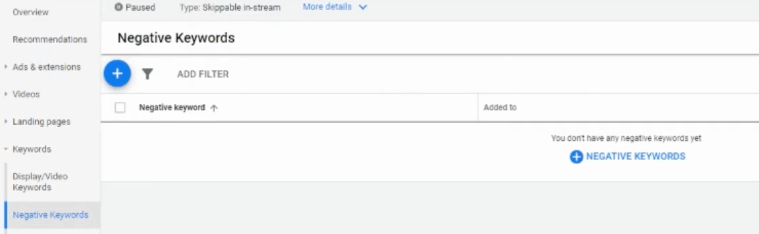
We don’t use keywords inside video targeting campaigns but we use negative keywords. They help push away people that you don’t want. For example, you can add negative keywords like “cheap,” “free,” “learn,” or “jobs” so that you won’t attract people searching for these terms.
Do you want to choose the specific YouTube channels and videos you want your ads to show?
Use Placements. It’s one of the best tactics you can use to attract large audiences easily. Here’s how to do it.
If you’re still inside your video campaign, click on Placements and click the pencil icon. Under edit placement, choose YouTube channels and paste the YouTube channel’s link. The YouTube channel’s name should appear–just select it and hit save.
If you want to show your ads in a specific video, just choose “YouTube videos” instead of “YouTube channels.”
Things to keep in mind:
- Your ad will only appear if their YouTube’s monetization settings is on.
- Separate your segmentation by ad group. Combining audiences will result in an “and” modifier which means your audience should have watched both videos first before they get to see your ad.
And that’s it! You now have an effective lead generation campaign that gets you qualified leads that you can turn into new clients.
Looking for Some eCommerce-Specific Tips for YouTube Ads?
Check out these videos:

What’s Next?
Author
Patience is the former director of marketing and communications for Solutions 8. A phenomenal content writer, copywriter, editor, and marketer, she has played a prominent role in helping Solutions 8 become an authority in the Google Ads space. Patience is also the co-author of The Ultimate Guide to Choosing the Best Google Ads Agency and You vs Google.