 Patience Hurlburt-Lawton
In case you missed it, Kasim and John have been hard at work over the past several months (cough, pandemic) making a few videos about Google Ads. And by “a few” I mean over a hundred—and the dynamic duo is still going strong.
Lucky for you, their videos are jam-packed with proven tips and tricks for building and managing high-performing Google Ads campaigns that even Google doesn’t tell you.
Of course, before you can dive into things like linking Google Analytics to Google Ads and tracking phone call leads, you’ll need to first build your campaign. Because this can sometimes be overwhelming for business owners who are new to Google Ads (or paid advertising platforms in general), Kasim and John have put together a step-by-step tutorial on how to get your Google Ads campaign up and running.
But more than that, they’ll show you the specific strategies that we use here at Solutions 8 and that we know really work. Because, as Kasim says, “You can follow Google’s tutorial and build a campaign, but that doesn’t mean it’s going to function.”
One quick note before we start: This tutorial is specifically for lead generation campaigns.
Meaning if you want someone to call you, fill out a form, or schedule an appointment, this video is for you. However, if you’re looking to boost sales on your eCommerce site using Google Ads, this video is not for you. (But don’t worry; that video is coming soon. In the meantime, here’s everything you need to know about Google Ads for eCommerce.)
And now that we’ve gotten that cleared up, let’s dive in.
I definitely recommend watching the video because John does an awesome job of visually walking you through the entire process, but here goes.
ADVERTISING GOAL
Start by signing in to your Gmail account and click on Google Ads in the apps menu.
The first page you see will ask, “What’s your main advertising goal?” and you are given three choices: Get more calls, Get more website sales or signups, and Get more visits to your physical location. Those all sound pretty good, right? Right. So, instead of choosing one of those three, go down toward the bottom of the screen where it says “Explore more campaign options and tools” and click on that.
This will bring you to a new page with several different goals that all seem to overlap, so we recommend starting with the option that says, “Create a campaign without a goal’s guidance.” Then, under “Select a campaign type,” choose “Search” and skip the next section that says “Select the results you want to get from this campaign.” (Because, again, they likely all apply.)
Click continue and you’ll get to the “General Settings” page.
CAMPAIGN NAME
Your Campaign name is going to be the top hierarchy of your Google Ads account, meaning it’s the starting point for everything you’ll be doing from here on out. That said, it’s important to know exactly what your campaign should be doing or what you are trying to accomplish as soon as you start.
Pro tip! The four campaign subtypes that Solutions 8 almost always builds for every client are Brand, Competitor, General, and Remarketing, and each will follow this process.
Depending on their product or service, some clients will also have a Display campaign, but the reason you want to segment them out like this is because it allows for more specificity and control. For the purpose of this tutorial, John chose to call his mock campaign “General – Lead Generation.”
Under “Networks,” keep in mind that Google will always default to what is going to get the most clicks, because obviously they want to make the most money. However, you’ll want to UNCHECK the Display Network box (and disregard the warning Google will give you) and keep only the Search Network box checked.
Pro tip! Whenever Google has something pre-checked or recommended,
you probably want to change it. Beneath Search Network and Display Network you will see an option for Show more settings; you can ignore that for now.
TARGETING AND AUDIENCES
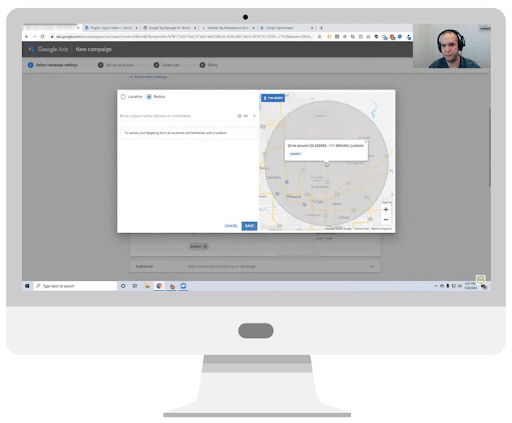
Under Locations, think about where your customers are likely to travel from and choose the “Enter another location” option to specify your target area. Radius targeting is a nifty option that lets you create a bubble around your target area and expand or decrease that bubble to fit your goals.
Next, you will see the “Location options” button. This is extremely important, but most people overlook it. (It’s also another example of Google pre-checking an option you don’t want.)
Under Target, choose “People in or regularly in your targeted locations.”
Under Exclude, choose “People in your excluded locations,” which you can choose by selecting the “Enter a location to target or exclude” option.
Under Languages, Google will default to English, but this is actually not correct for a Search campaign like this one. Instead, choose “All languages,” to reach more potential visitors.
More often than not, our recommendation is don’t start with an audience. So, click and expand the “Audiences” section, but avoid any audience segmentation for now. Leave the “Observation (recommended)” option checked.
BUDGET AND BIDDING
John recommends setting a good daily budget, and knowing that you may go over, and you may go under. For the mock campaign, he started with $50 a day.
Under Bidding, the Google default is going to automate your bidding strategy. However, we do not recommend that. Instead, we recommend doing everything manually in the beginning, so click on “Select a bidding strategy directly” and select “Manual CPC” from the dropdown list. (Again, ignore the Google warning.)
Side note: Solutions 8 has created videos about
all of the bidding strategies listed if you’d like to check those out.
After you select “Manual CPC,” click on “Show more settings.”
Set up your “Ad schedule” based on what you want users to do on your website. So, if you want people to call you, but you only answer calls during normal business hours, make sure your ad runs during those hours.
Keep “Ad rotation” on “Optimize: Prefer best performing ads.” (This will automatically choose the ad with the best click-through rate, the lowest cost per click, the highest conversion rate, and so on.)
“Ad extensions” are additional pieces of content that you can include with your ad to expand your real estate on the search page and improve the performance of your ad. Definitely use them to your advantage. To start, we recommend using Sitelink extensions, Call extensions, Callout extensions, and Structured snippets (which you’ll find by clicking on the “+ Ad extension” link.) Structured snippets are like amenities; they’re more about what you have, not who you are.
Check out the video for a more detailed explanation of each ad extension.
SET UP YOUR AD GROUPS
“Ad groups” are the variances that will take place inside of the campaign. So, think of a topic, and now think of all of the different word groups inside that topic, and that is how you’ll come up with your Ad group name. For example, if you have a dental office, one ad group could be Local Keywords (Scottsdale): dentist Scottsdale, dentist Phoenix, dentist North Phoenix. Other ideas include areas of speciality or specific services.
For more general Ad groups (e.g., “dental”), be sure to use the “Get keyword ideas” tool to help match your ad copy to what your customers are looking for.
For more specific Ad groups, start with Broad match. This means that whatever is being searched, it has to include these keywords, and you do this by starting with a “+” symbol. So, if your Ad group name is “All On Four” (a type of dental implant that supports all teeth on four main anchors), you could use: +all+on+four, along with +all+on+4 and +all+on+four+near+me.
Keep in mind that you can only create the ads for the Ad group and not for the Keyword; this is very important. You shouldn’t put “Implant” and “All on Four” in the same ad, because you don’t want someone searching for All on Four to see the Implant ad.
CREATE YOUR ADS
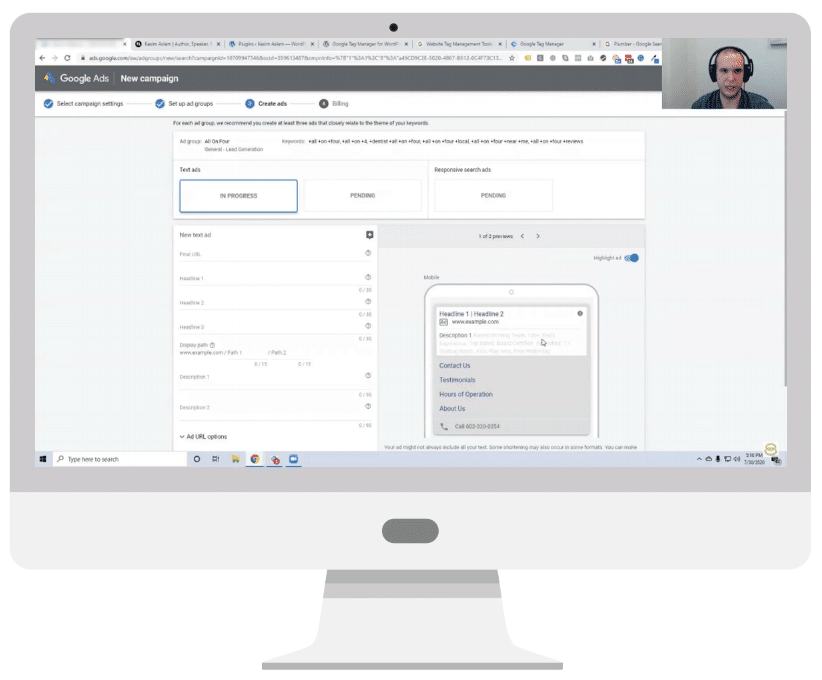
Google recommends at least two text ads and one responsive search ad. ,/
Starting with your first text ad, go ahead and fill out the information for “New text ad,” beginning with the Final URL. In most cases this is the website home page; however, if you have an ad for a specific service and a web page on your site dedicated to that specific service, the ad should land there. For example, going back to the dental practice example, if you have an All on Four page on your website, send the All on Four ad directly to that page.
Next, your three headlines. These should address both relevancy and pain points at the same time, and you always want to use title case (i.e., the first letter of every word is capitalized) because data shows that it always outranks and performs better for click-through rates.
- Headline 1: This headline should be very closely matched to the keyword that a user types in, which is why we do things by singular ad groups. Example: “All On Four Dental Implants”
- Headline 2: This should highlight a key feature or benefit. Example: “New Smile On Day One”
- Headline 3: This should highlight another key feature or benefit. Example: “Pain Free & Top Rated”
The Display path can be anything you want, but it doesn’t have to be the same page as the final URL.
Your Description 1 should be super relevant and include all of the headline text, plus additional benefits. For example: “All On Four Dental Implants. Receive Implants On The Same Day. Top Local Dentist.”
Your Description 2 can be something like, “Open 24 Hours A Day. We Accept All Major Insurance. No Cash Up Front. Financing Available.”
The last thing you will need to do is add your billing information, but at this point you’re really only about halfway done.
EXPLORE YOUR CAMPAIGN
Now that you’ve created your campaign, it’s time to put all the rest of the pieces together and, as John says, do all the stuff that’s going to help your campaign perform better.
And the first thing we’re going to do is add something called RLSA, or Remarketing List for Search Ads. The reason for this is because more than half of all conversions take at least two ad clicks.
So, say someone Googles one of your keywords, clicks on your ad, and goes to your website but leaves without converting. Then, three days later, they search for one of your keywords again because they don’t remember the website. Thanks to Google, your campaign will be able to identify that the person searching has been to your website before, and it will pay more for just that particular person when they come back to the market.
To set up RLSA, go to Tools and Settings up at the top right, then go into Audience manager, and click on the “+” symbol to “Create remarketing list.” Next, choose “Website visitors” then “Visitors of a page” and add your URL. You can leave the Pre-fill options section on “Pre-fill list with people who matched the rules within the past 30 days” and then choose the Duration (i.e., how long you want someone to stay on the list). The Description here is optional, but for John’s example he used “Visitors To My Website.” Once you click “Create audience,” that audience will now appear in your audience list.
Now that you’ve created an audience, the way you use it is by going back to your campaign, going to Audiences, and selecting “ADD AUDIENCES” next to the “+” symbol. Leave it on Observation mode, click on Browse, select “How they have interacted with your business,” select the audience you just created called Visitors to My Website, and click save.
At this point, you may see a message that says “Too small to target for Google properties” but once at least 1,000 visitors have gone to your site, this will automatically turn on.
With this new Audience, you will then use something called an Advanced Bid Adjustment. We usually start with a 30% to 40% positive bid adjustment, so that even if there is high competition, this will automatically up your maximum bid by 40% when a previous site visitor is searching one of your keywords again. That way, you can ensure the visitor sees your ad over a competitor’s ad.
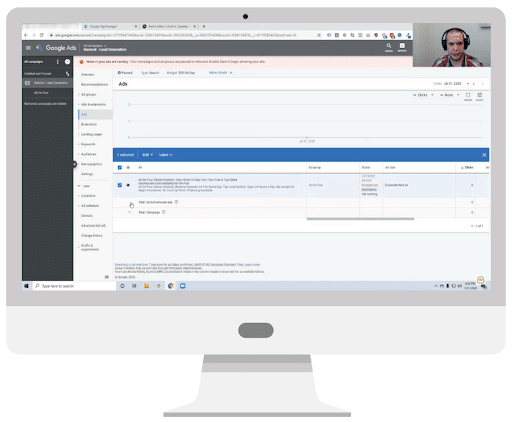
ADDING MORE ADS
If you’ll remember, you need two expanded text ads and a responsive ad. So, now you’ll create your other two ads. A simple way to do this is by taking the expanded text ad you already created and making a duplicate copy by choosing Edit, Copy, and Paste. This allows you to simply edit an actual ad that is already available. In this second text ad, you can then create a different headline and easily change up your descriptions
Finally, you need to make a responsive search ad. We do this last because, by this point, Google should be able to tell you what should be in it.
Click on Create an ad, choose Responsive search ad, select the same Ad group you’re in, and it may or may not autofill your information. What’s great about a responsive ad is you get to create a lot of different headlines (15) and descriptions (4) and Google will start to piece together what seems to be the best headline/description combination based on what has produced the best results. Remember to always use title case!
Finally, if you have a keyword, it’s a good practice to pin your keyword as your Headline 1. That way, it will remain the first headline, and only Headlines 2 and 3 will be A/B tested.
Pro tip! You can actually “spy” on your competitors with tools like iSpionage, SpyFu, and SEMrush and repurpose their ad copy to avoid reinventing the wheel.
ADD NEGATIVE KEYWORDS
A negative keyword is a keyword that is searched for in Google along with any of your keywords that you’re targeting, but that you do not want to show up for. This is something you need to keep up with on a daily basis.
Funny story! Here at Solutions 8, we have a list of more than 100 negative keywords that we add to every campaign as a rule, including nude, nudity, porn, porno, and pornography. (Because hey, people search for crazy stuff, but we don’t judge.)
For keywords like these that you know you will never want to add in any campaign ever, go back to Tools and Settings at the top right, go to Shared Library, choose Negative keyword lists, and add them there. From there, you can apply all of the negative keywords on that list to each of your campaigns.
CONVERSION TRACKING (aka THE MOST IMPORTANT PART OF THIS WHOLE PROCESS)
Setting up conversion tracking is extremely important; otherwise, you’ll have no idea what’s going on with your ad campaigns and no way to optimize.
That said, we recommend using Google Tag Manager. This is a piece of code that, once placed on your site, can be continuously manipulated to do other things. For example, you can add analytics, set up call tracking, and even track all of your conversions through Google Tag Manager.
To set up Google Tag Manager, go to tagmanager.Google.com and use the same sign-in you use for your Google Ads campaign.
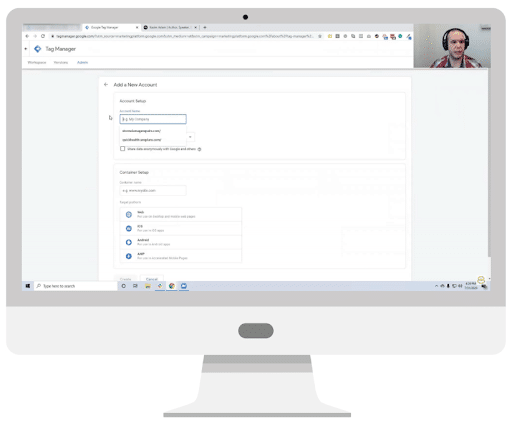
Click on “Create Account.”
Add your company name and country. Check the box that says “Share data anonymously with Google and others.” This just gives you a little more insight when they start to create different applications.
Moving on to “Container Setup,” your container name is just your business site name with nothing before or after (e.g., businessname.com).
For “Target platform,” choose “Web.” Click “Create” and sign the Terms of Service Agreement, and voilà! You’re in Google Tag Manager.
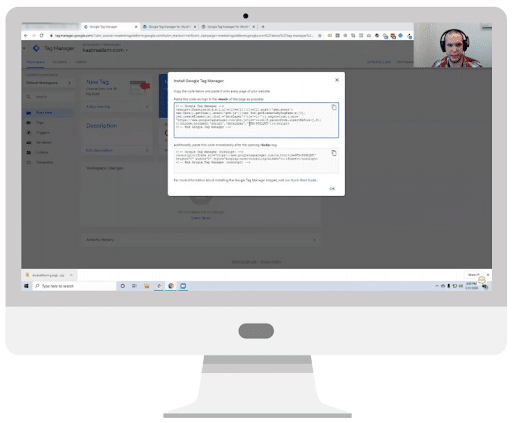
The first thing you will notice is a pop-up box; DO NOT CLOSE THE POP-UP BOX. That first piece of code (the <head> code) is the one you will need for your website. Go ahead and copy it and log in to the back end of your website. Keep in mind that each different CMS will have a different way of implementing this code, but you can also install it using Plugins.
Install and Activate the plugin, then go to Settings, and you will be asked for a Google Tag Manager ID; this is part of the piece of code you copied to paste and begins with “GTM” followed by a dash and six characters (e.g., GTM-XXXXXX). Choose the “Codeless injection” option, click “Save Changes” and go to the website front end, where you should see your Google Tag Manager.
Now what?
Well, now that you have Google Tag Manager installed on your site, you want to look at what conversions you want to track. For example, if you have a “Let’s Chat” call to action on your site with a form to fill out, you can track each time someone fills out that form.
Pro tip! Always make sure your form rolls to a thank-you page (website.com/thank-you/). This is a 100% accurate way to track conversions, because the only way a visitor can get to that page is by performing the desired action.
So, find your thank-you page URL, and go back to Google Ads. Go to: Tools and Settings, Conversions, Add a Conversion, and choose “Track Actions on Your Website.”
You will then be prompted to “Create a conversion action” for your website. Under “Category,” because in this case it is a contact form, select “Contact.” It will then ask you for a “Conversion name,” and here it is important to be as specific as possible so you can remember later on what it means.
Since this is not an eCommerce action, you can skip the “Value” section, and for “Count” we recommend choosing “One” for a lead form so conversions are not counted double if a visitor fills out a lead form twice.
For “Click-through conversion window,” we recommend 90 days (for a longer sales cycle), and for the “View-through conversion window,” one day is fine since this is not a Display ad.
Check the “Include in conversions” option.
For “Attribution model,” we always recommend time decay. We have a video about this, too, but choosing time decay essentially gives more credit to the clicks that happen closer to the time of conversion, which gives you the full picture of everything.
And finally, turn on “Enable enhanced CPC to help increase conversions…” and click the “Create and continue” button.
Next, you’ll be prompted to select how you want to install your tag. Select “Use Google Tag Manager,” which will bring up a short instruction list. Keep that window open and navigate over to Google Tag Manager, where you will focus on two separate actions: Triggers (when it fires) and Tags (what happens when it fires).
Start by creating a new Trigger (e.g., Contact Form Submission) and choose “Page View” for your Trigger configuration. Then, select “Some Page Views” and add in the event that needs to occur for that trigger to happen, for example when the page URL equals “/thank-you-contact”.
Pro tip! To facilitate tracking, avoid using the same thank-you page for multiple actions (e.g., filling out a contact form and downloading a whitepaper). You can differentiate by calling them /thank-you-whitepaper, /thank-you-contact, /thank-you-schedule.
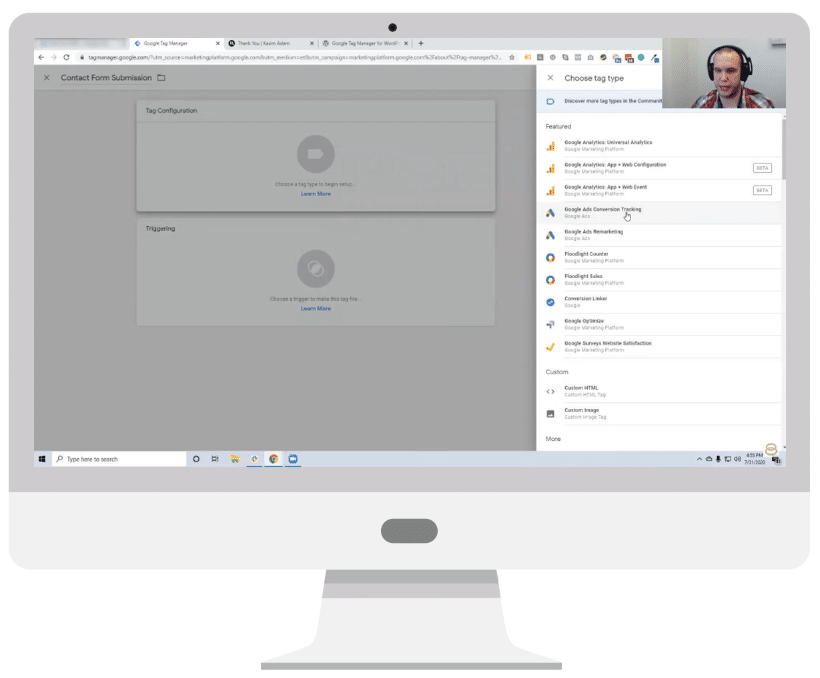
Save your Trigger and now add your Tag.
For the Tag configuration, select “Google Ads Conversion Tracking.” This will open up a form where you will need to paste your Conversion ID and Conversion Label. That’s all you need to do for that top section. Now, go down to the bottom and click on Triggering, and the Trigger you created should be there. Click save.
Important! Once you are done setting up all of your conversions, click Submit and then Publish. Then, you can go back to Google Ads and click Next and Done.
One final thing:
Once you have enabled your campaign and gathered about a day’s worth of data, go back to your campaign and the Keywords section to change the initial $ bid you started with. Go to Columns, Modify columns, and Attributes, then select Est. first page bid, Top of page bid, and Est. first position bid Click Apply. Once you’ve started, these will tell you what you need to bid to get to each position (e.g., on the first page of search results, at the top of the first page, etc.).
Now you’re ready to optimize!
And guess what? John and Kasim have tons of videos on that, too. Check it out!
(And be sure to like, subscribe, and tell your friends about the Solutions 8 video library so they can be successful with Google Ads, too.)

Here’s What One Of Our Customers Had To Say…

Tim Lyons
Founder || ProFit Marketing Solutions
Two-time “Two Comma Club Award” Recipient

Interested to work with us?
No cost. No obligation. No high-pressure salesmanship. The action plan is yours to keep regardless of whether or not you choose to move forward with us. What do you have to lose?
Author
Patience is the former director of marketing and communications for Solutions 8. A phenomenal content writer, copywriter, editor, and marketer, she has played a prominent role in helping Solutions 8 become an authority in the Google Ads space. Patience is also the co-author of The Ultimate Guide to Choosing the Best Google Ads Agency and You vs Google.